Not all digital photo files are created equal. There are many different types of file popular for storing and viewing photos, and each comes with their own set of pros and cons. The one major problem with having so many options for hosting files, is the issue of converting between them. Some applications or software options can only host/view certain file types. Other instances will require you to choose better optimization over higher quality. This can force you to try and convert these files from one type to another.
In the case of converting files, Mac users have their own set of obstacles that they must overcome. A great number of conversion methods require the user to be on Windows operating systems. However, not all hope is lost for Mac users. Let’s talk about how to convert PNG to JPG on a Mac.
PNG vs. JPG.
Before we dive into how to convert between these two file types, let’s go over a brief introduction of what PNG and JPG files are in the first place.
PNG
PNG stands for ‘portable network graphic’. It is by nature a ‘raster’ file, which means that it builds the image piece-by-piece. PNG’s have lossless compression which means that the host will not lose any image quality by reducing or expanding the size of the image. No matter how the user shrinks or expands the image, it will remain the same resolution.
JPG
JPG stands for ‘joint photographic group’, and can sometimes be referred to as ‘JPEG’. JPG files are most commonly used when transferring large quantities of images, as they can be reduced to a very small size. This will result in loss of some resolution quality, but JPGs are great for apps such as WhatsApp, Snapchat, Emails, Web Pages etc,.
How To Convert PNG to JPG
There are many reasons to convert a PNG file to a JPG file. While PNG files may be able to host higher quality images, JPG are vastly more popular for a multitude of reasons. JPG files allow for faster image loading speeds, and are especially popular among web and app developers. This is because the faster loading times allow for less user loss as the response time of the web page/app will be dramatically increased over PNG files.
If a web page or app uses PNG files, there will likely be noticeable loading times that can make users feel as if the web page is poorly designed/optimized. For this reason, many web designers prefer to use JPG files over anything else. So, if you need to convert your photos on a Mac, here are your best options.
Convert Using ‘Preview’.
The most popular method for conversion is to simply use the ‘preview’ option. This is probably the easiest method for most, and will require very little technical knowledge on your part. Here are the basic steps:
- Locate the PNG file you wish to convert within your photos.
- Select the ‘preview’ option.
- Click the ‘file’ option after selecting ‘preview’.
- Click ‘export’.
- Select ‘JPG/JPEG’.
- Click ‘save’.
This method is tried and true, but can be cumbersome when trying to convert multiple images at a time. This will serve you best if you only need to make the PNG to JPG conversion every once in a while.
Convert Using ‘Automator’
Another option for conversion is to use the Mac automator option. This will allow you to automate any file conversions on the fly, for faster conversion in the future. This is ideal for those who have to consistently make the PNG to JPG conversion, and wish for the process to be faster. Here are the basic steps:
- Click on the ‘go’ drop down menu.
- Select ‘applications’.
- Click ‘automator.app’.
- Select ‘service’ in the automator app.
- Click ‘choose’ at the bottom.
- In the new dialogue box, change the ‘service receives selected’ box to ‘image files’ in the drop down menu.
- Under the ‘actions library’ select ‘photos’.
- Double click ‘change types of images’.
- Select ‘JPG/JPEG’ in the ‘to type’ drop down menu.
- Save the service under any name you choose. Example: ‘Image file JPG converter’.
- Close ‘automator’.
- Right click the image file, and select the service you just created.
This method can seem like a bit of a headache at first, but is actually rather easy to set up once you grasp the concept. With an automator service, you can convert image files without even opening up a single program after you set up the service.
Convert Using ‘Terminal Command Line’.
If you want to convert using the ‘SIPS’ options for PNG files to JPG files, you can do it rather easily using the terminal command line as follows:
- Open ‘terminal’.
- Type ‘CD <directory name>’. You will need to type the actual name of the directory.
- Type ‘sips -s format jpeg -s formatOptions 80 Image Name.png –out IMG_1354.jpg’ You will need to type the actual name of the PNG file.
- Press ‘return’.
This will automatically convert the image into a JPG/JPEG file once ‘return’ is pressed. Another thing to note is that once the terminal is opened, after ‘cd’ is typed into the command window, the folder containing the image file can simply be dragged and dropped into the command line instead of typing the directory name manually. This usually saves time, but is up to your own personal preference.
Convert Using ‘Free Online’ Programs.
Another option for those who don’t want to have to wrestle with the technical aspects of the above mentioned methods, is to simply use free online conversion tools. This can be done rather easily by following these simple steps:
- Launch your web browser and search for the site you will be using to convert.
- Select the ‘choose file’ option.
- Select the PNG file that you wish to convert. You may also drag and drop the file if it is more convenient.
- Wait for the files / files to upload, then click ‘convert’.
- Once the conversion process has finished, click the ‘download’ option to download your newly converted JPG files.
This option is great for those who don’t want to struggle with technical jargon or setting up automation processes. The online convertors will handle all the ‘heavy lifting’ for you. However, it is important to note that not all online convertors are free, and you should be careful of which ones you use/select. Always protect your own identity and safety when converting files online.
Convert Using Adobe Photoshop.
If you are familiar with photoshop, and are using it anyway, you can convert your PNG files to JPG rather easily through the program. Here are the simple steps you should follow:
- Open the file using Adobe Photoshop.
- Click ‘file’.
- Select ‘save as’ in the drop down menu.
- Under the ‘format’ drop down menu, select ‘JPG/JPEG’.
- Click ‘save’.
This option is fast and easy, especially if you are using Adobe Photoshop anyway. However, with this option you will not be able to edit the photo with the layers/edits after you have saved it from PNG to JPG. In this case, you should be careful that you are saving a completed image, and not one that you still wish to edit or do work on.
Other Tricks.
The options mentioned above are great for simple and easy PNG to JPG conversion. However, for those who want to keep their original file, they might not be the ideal solution. There may be some cases in which you want to convert the PNG to a JPG while also maintaining the original PNG file for use or reference. In this case, try this method
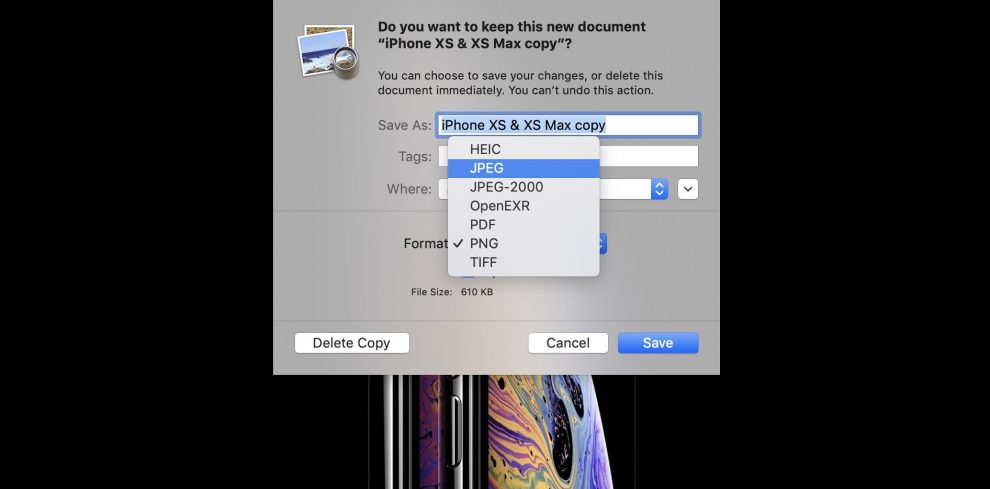
Using the ‘preview’ method mentioned above, simply select ‘duplicate’ instead of ‘export’. Once you reach this point, you will just need to follow the same steps as the above mentioned method; but this time the file will be copied as a JPG rather than replaced.
This option also allows you to rename the duplicate so that you can more readily identify the different files on the fly. This is a great option for those who only need the JPG for specialized situations, and do not wish to replace the high quality PNG image file altogether.
You can also use third party image conversion apps in a similar way to the online method mentioned above. Bear in mind that apps might cost you money, and are less likely to be free. If you are using an Apple mobile device, this might be the simplest option as many third-party apps can do the conversion with the simple click of a button. Just make sure to properly reference reviews of the app to prevent yourself from wasting time or money on less than optimized applications.
Before You Start Conversion.
Before you actually engage in the image conversion, it is important to keep a few things in mind. Once you have established your desired method, and have verified it will work for you, consider the ramifications of the actual conversion.
First, you should keep in mind that many of these methods will replace the PNG file completely. This will leave you with the JPG file only. Converting back to JPG can be done with the first method mentioned here; although, it could result in some loss of photo quality in the process. However, usually this loss is very minor and will not be noticed by the casual observer.
Another thing to consider, is the ramifications of ‘downgrading’ the image altogether. In the case of web design/development, often the photos used are purchased through a third party designer/photographer. In this case, it is important to get the ‘OK’ from the designer/photographer before downgrading the quality of their image. This is especially the case if you are going to be assigning credit to the designer/photographer on the web page. They may not want their work associated with a lower resolution JPG.
Once you have fully understood the process of the conversion, and the consequences it will bring, you can set about converting your PNG to a JPG as often as you like.
Final Thoughts.
Converting PNG files to JPG files or even PDF on Mac is a rather simple process once you get the hang of it. In many cases, the right method for you will come down to what is most convenient. If you are planning on doing large batches of conversions over time, you might want to choose a method that can streamline the process; such as the automator or online tool options. If you only anticipate having to convert once in a blue moon, then the method that you find easiest is going to serve you well.
Luckily, we live in a digital age that is made to help users of all experience levels make conversions such as these a breeze. Now all you have to do is select your method of choice, and convert to your heart’s content!