Wondering how to create an online course website with WordPress and sell courses on it?
Don’t worry, we’ll show you how to create an online course site with WordPress as easily as possible. so you can focus on creating the best courses your audience needs.
First, let’s make things simple for you; There are 2 ways you can get your course online.
1. Creating your own online course site and publishing on it
2. Publishing your course on an online course platform like Udemy
Publishing your first course on a platform like Udemy might seem like a quick and easy way to take your course online to your audience.
But it’s not profitable in the long run as not only will they take a commission on your sales, but you will have no brand value as the platform is the one your audience will remember.
For example, the instructor will get as low as 37% of the total revenue of the sale if the course is published through Udemy’s promotion.
So if you’re planning to publish follow-up courses and create a brand for yourself, you should create your own online course website like Udemy instead of depending on it.
But you might think building your own website is complex and time-consuming, and to answer that, Yes, it was! But not anymore. There is a new product on the market which takes a new & different approach.
Imagine you can get the power & flexibility of WordPress, but also not spend days & hours setting it up manually by yourself.
MakeYourWP is one of the best platforms out there that lets you launch your WordPress site with just one click.
MakeYourWP makes the process of building your website easy and hassle-free. It lets you launch any type of site you want in a single click with pre-designed templates.
So, all you need to do is start uploading your course content, and you will be able to sell online courses from your own website.
They provide free maintenance and take care of your site by managing site’s security and backup.
So you can focus on creating your courses.
They also provide 24*7 support, so if you were to run into an issue, it could be resolved anytime.
In this article, we’ll see how to launch your online course site step by step using MakeYourWP and how it compares with other services.
Building your Online Course Site in 5 steps with MakeYourWP
- Choose a plan that fits you.
- Add your course/content to your site.
- Edit the content of any page
- Change it into Paid Course
- Get your preferred domain
Step 1 – Choose a plan that fits you.
First, you need to select a plan that fits your need, just click here, and it’ll take you to this page. 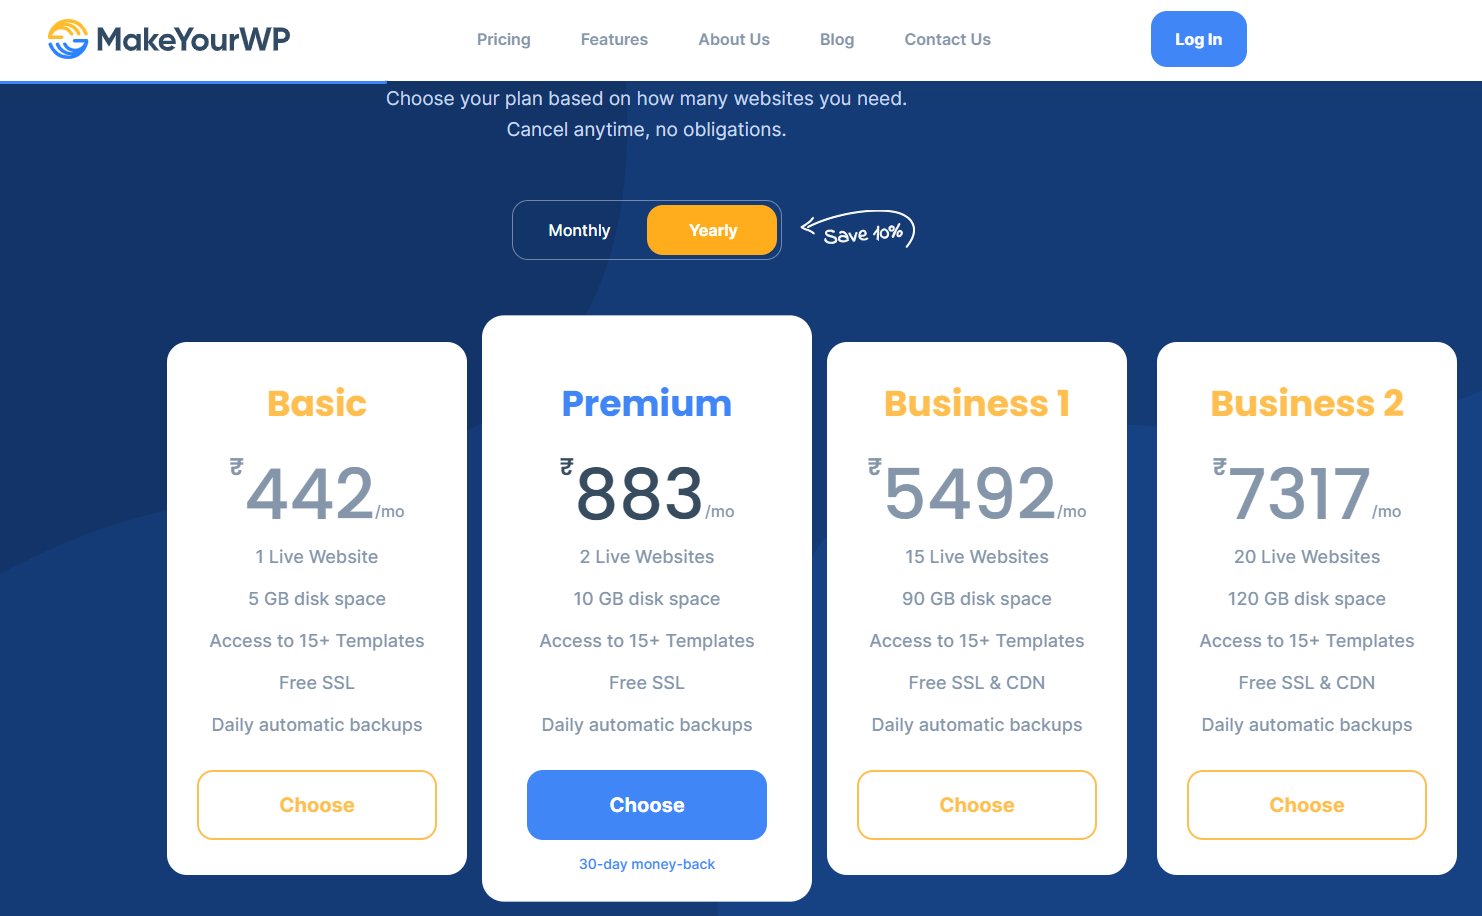
Now select a plan based on your need.
You can consider premium and business plans if you’re planning to launch more than one website.
But for beginners, we recommend sticking with the basic plan, which covers all the needs.
So just choose the plan and make the purchase.
Once you’re done,
Enter a temporary URL you want for your site
Now, this will be ‘example.makeyourwp.com’ as it’s a temporary domain.
We will see how to get your own unique domain in the upcoming steps,
Next, select the ‘Online Course Website’ Template.
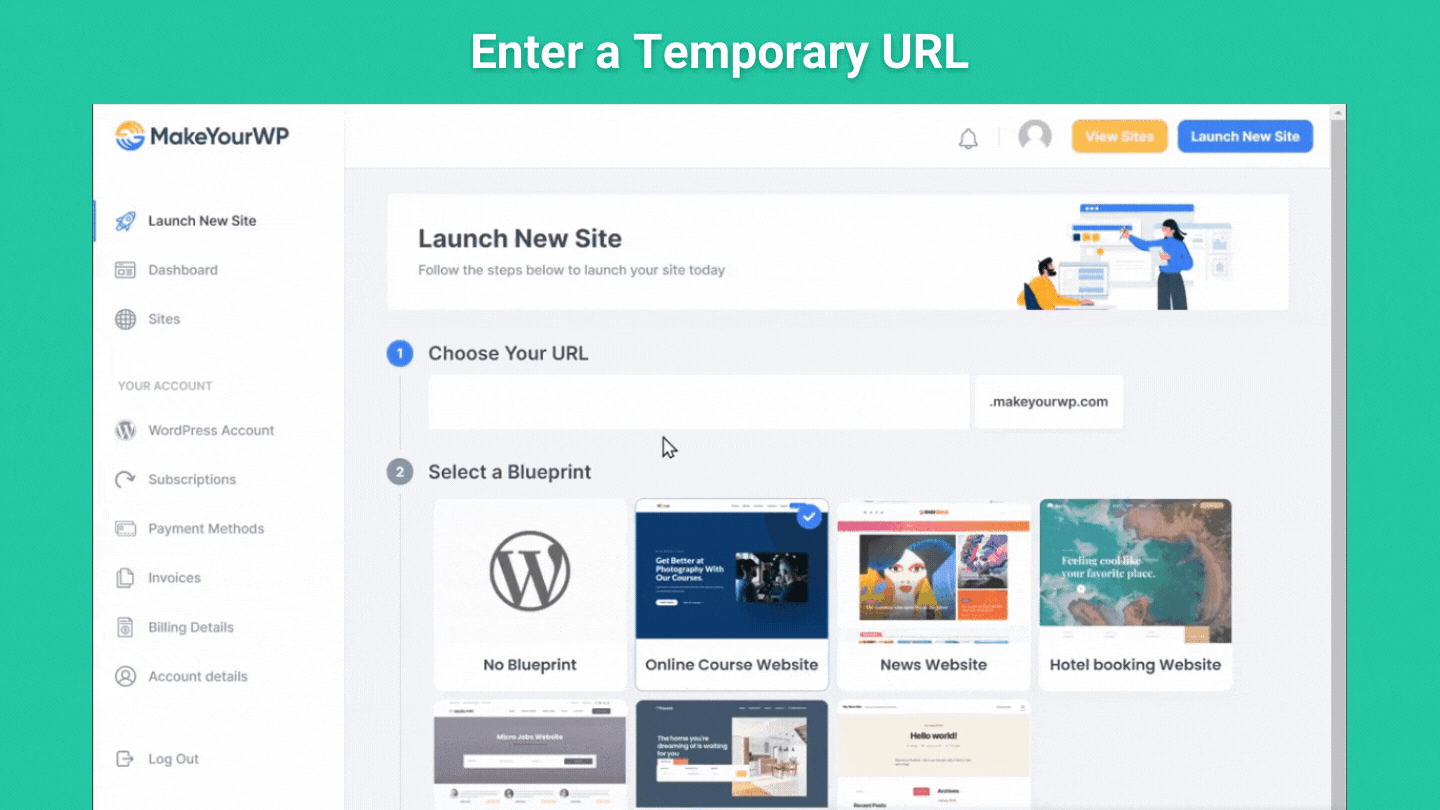
Then click, launch it.
Once you click ‘Launch,’ your website will be launched with all the necessary features.
Next, all we have to do is add our course to the site,
So let’s go to 2nd step, which is to add our content site.
Step – 2 Add your course/content to your site.
Now you can add your course in 3 easy steps.
2.1 Login to the WordPress admin area
To add your course content to the site, you need to log in to your site. To do that, go to your ‘MakeYourWP’ account and to the admin area.
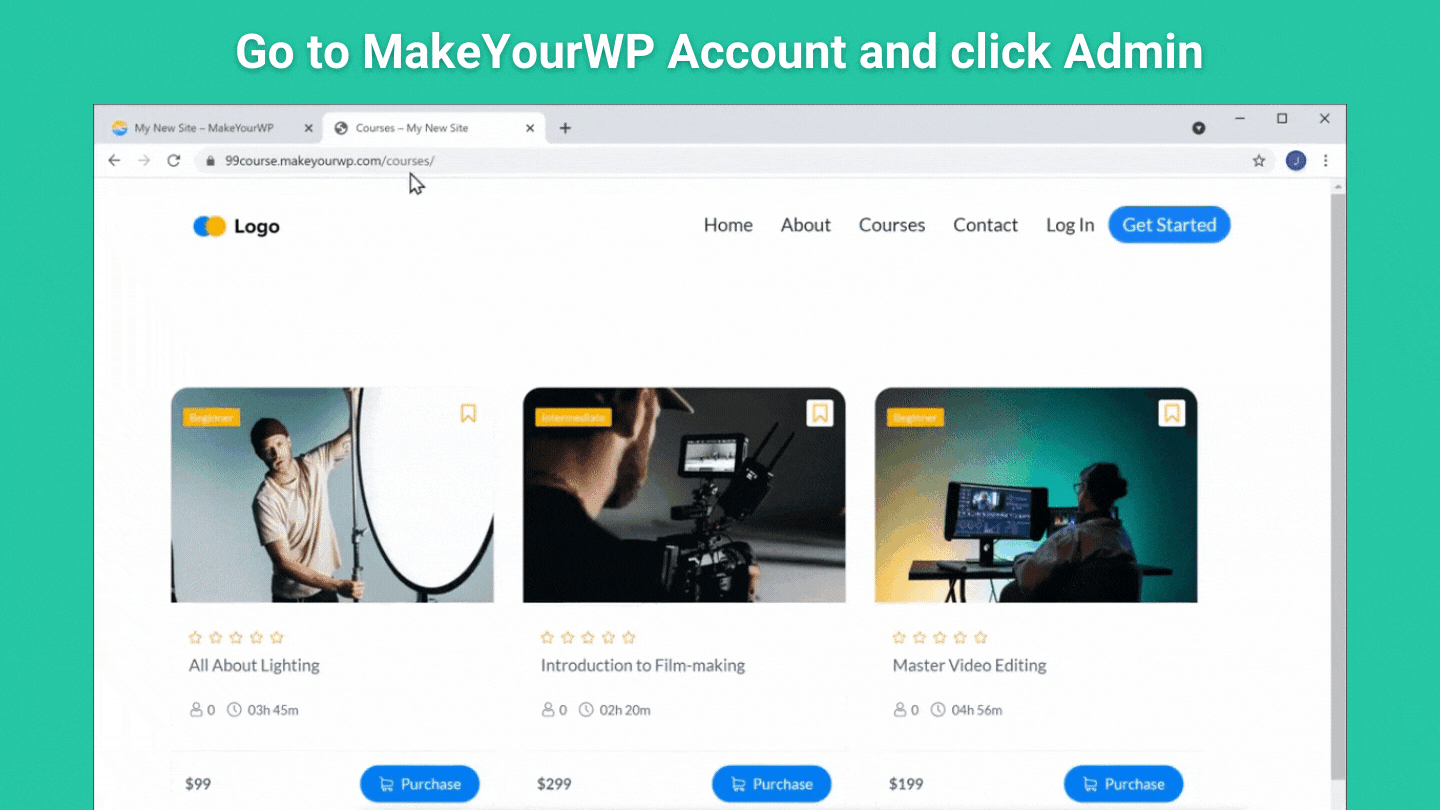
Once you log in here,
You can access the WordPress dashboard, where you can add the course content.
So next, let’s see how to add your course.
2.2 Add your course content to the site.
Now to add our content,
First, we need to remove the demo content.
So to remove it, go to ‘Courses’ and select ‘All courses’ 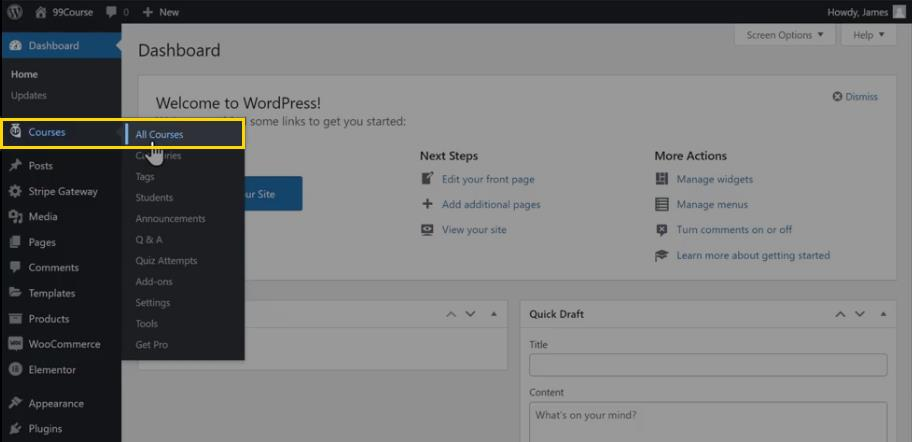
Select all the demo content using the ‘select all’ check box
Click on ‘Bulk Actions’ and move it to trash. 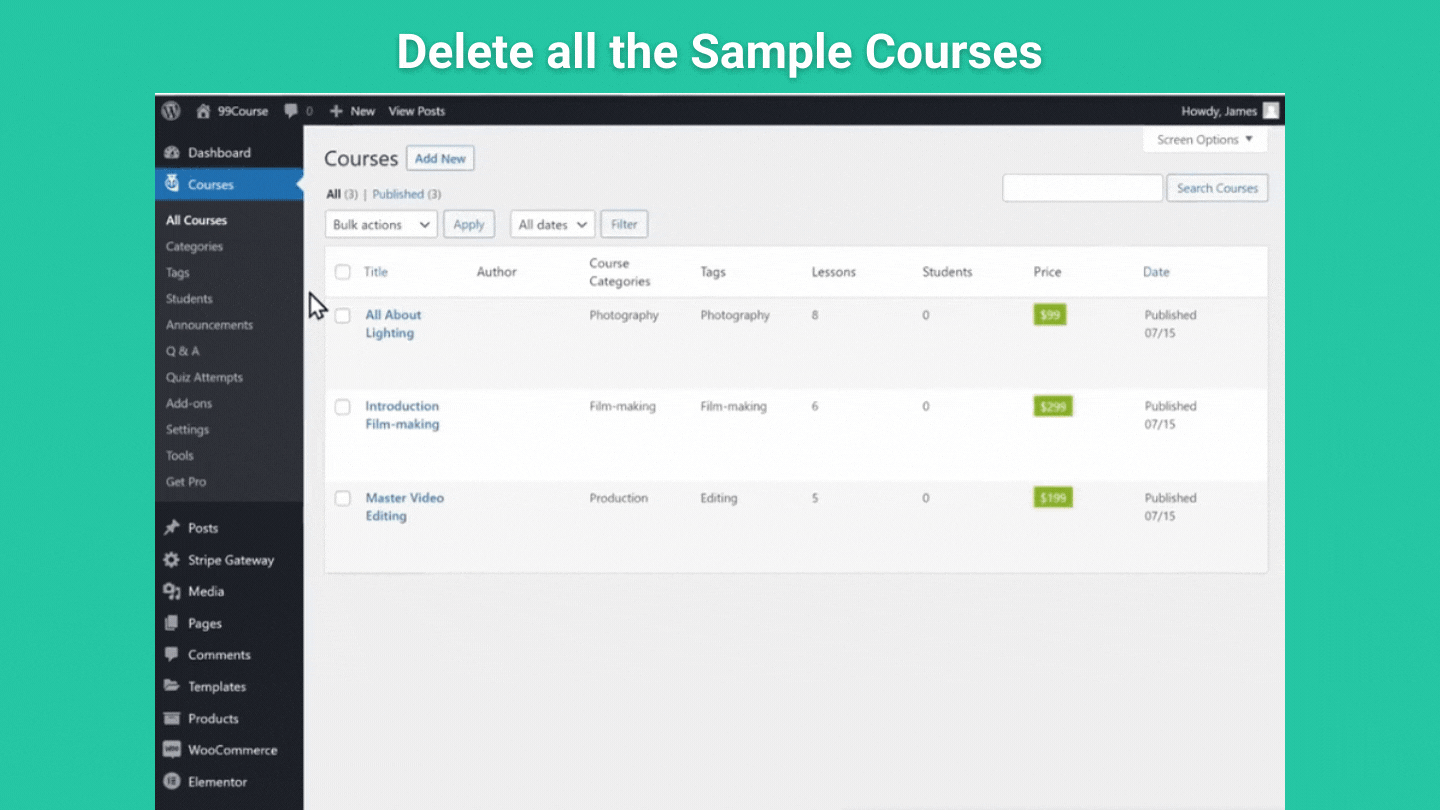
So we have now deleted the demo content.
Next, we can start adding the content,
So to add the course content to the site,
We need to
- Add details about the course
- Add topics to the course
- Add lessons to the topics
2.2.1 Add details about your course
Just go to courses and click ‘Add New,’
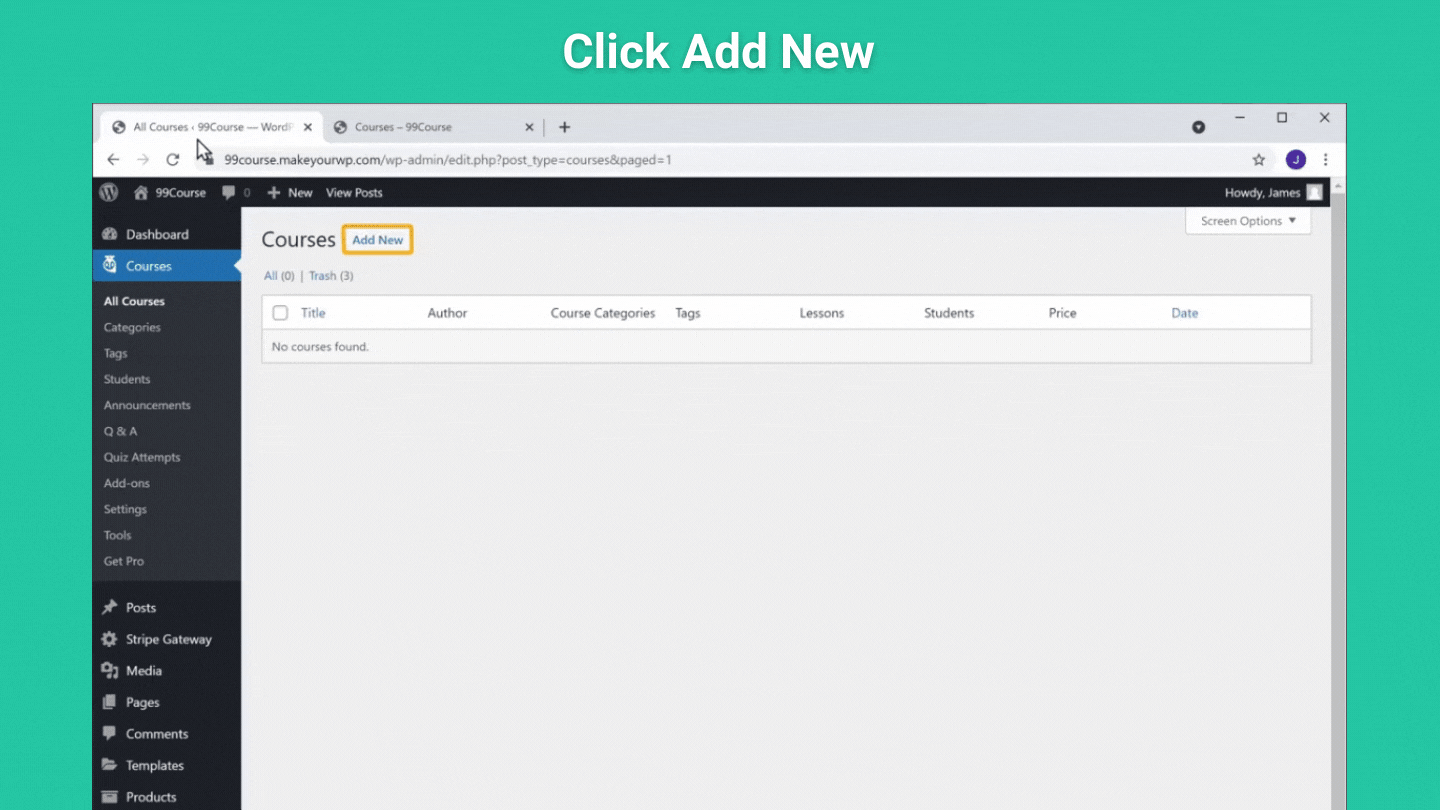
And you will get this page,
Now, here you need to enter the details about the course.
So first, give a name for your course,
And add a description along with an image
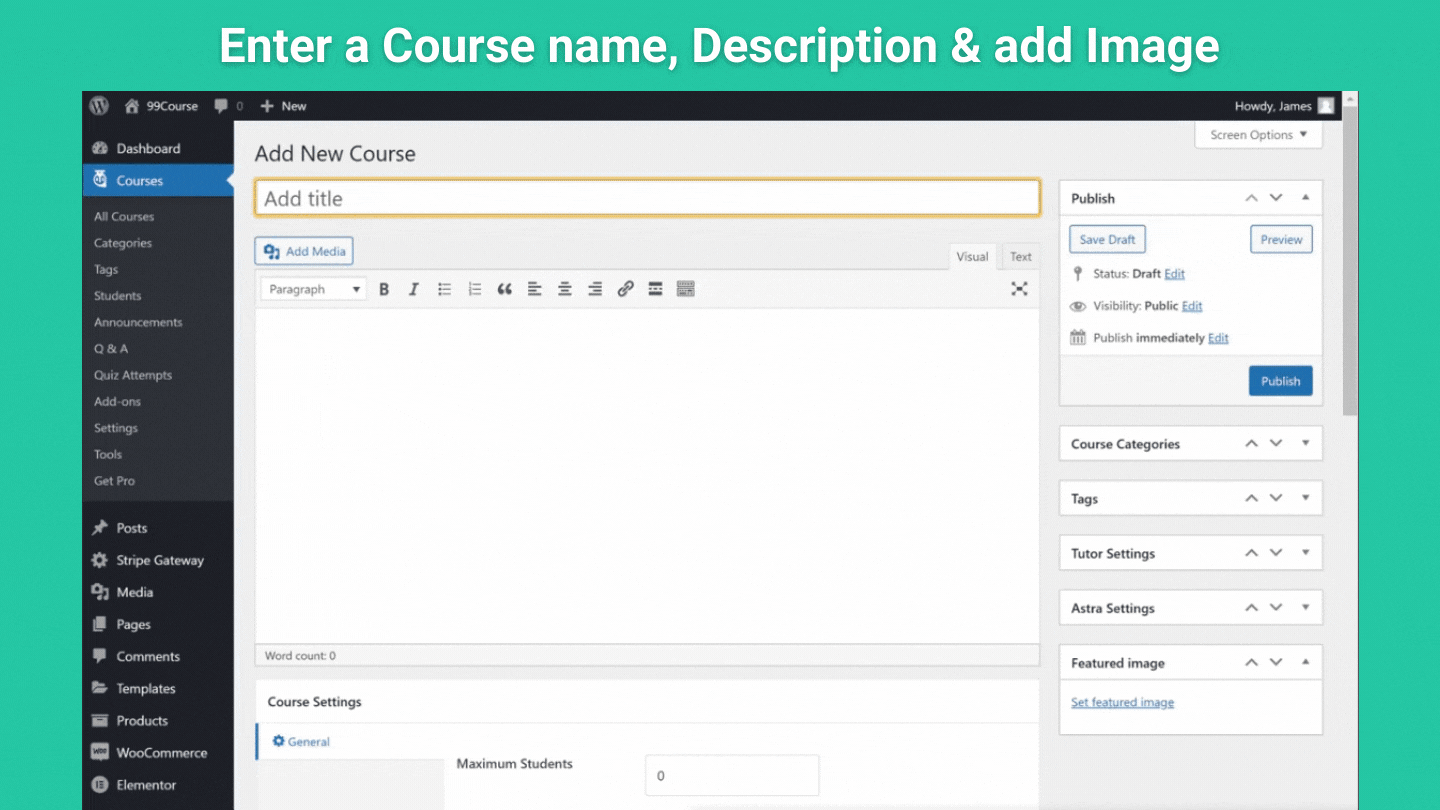
Once you’re done, click ‘Publish’
So we have completed adding details about our course.
And if you want, you can take a look at the site to see your new changes.
Next, you need to add the topics to your course.
2.2.2 Add topics to your course
So to add the topics.
Just go to your course page,
Scroll down and click add a new topic.
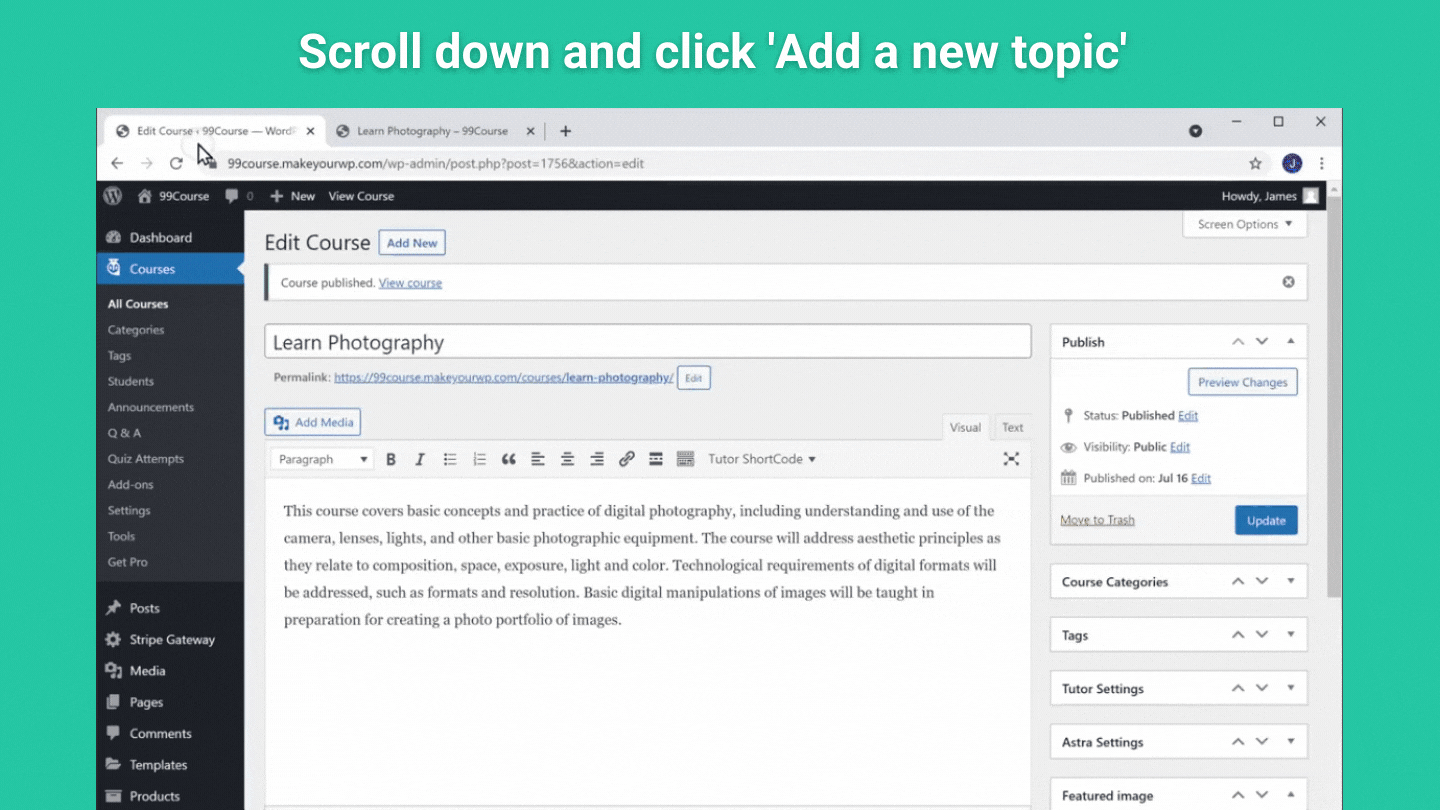
Now enter all the topics you want to add,
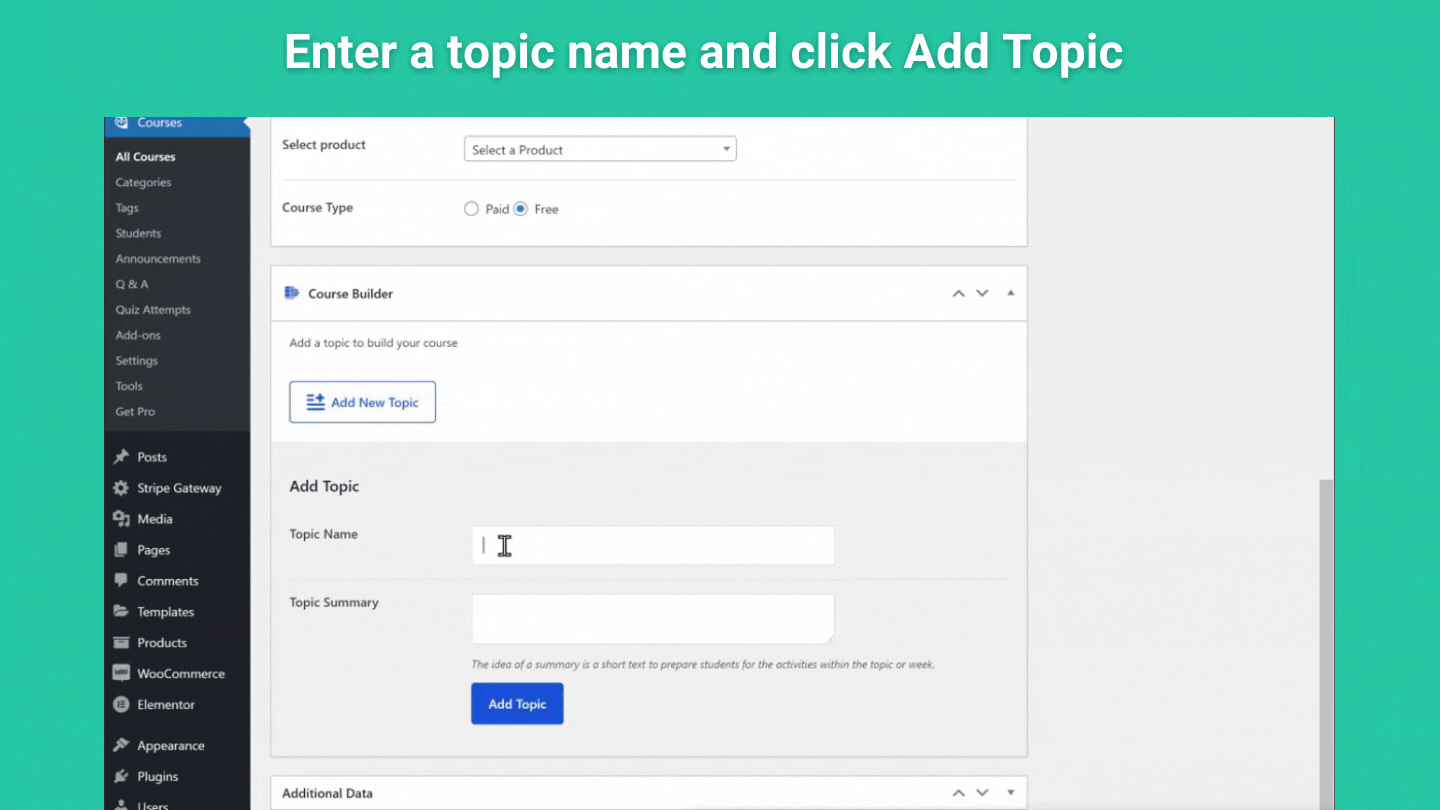
Once you are done adding
These topics will appear as headings on your course page, like this.
And now, we need to add lessons to all the topics here.
2.2.3 Add lessons to your topics
So to add the lessons:
Just click on Lesson and enter the title for your lesson.
And then click ‘update lesson.’
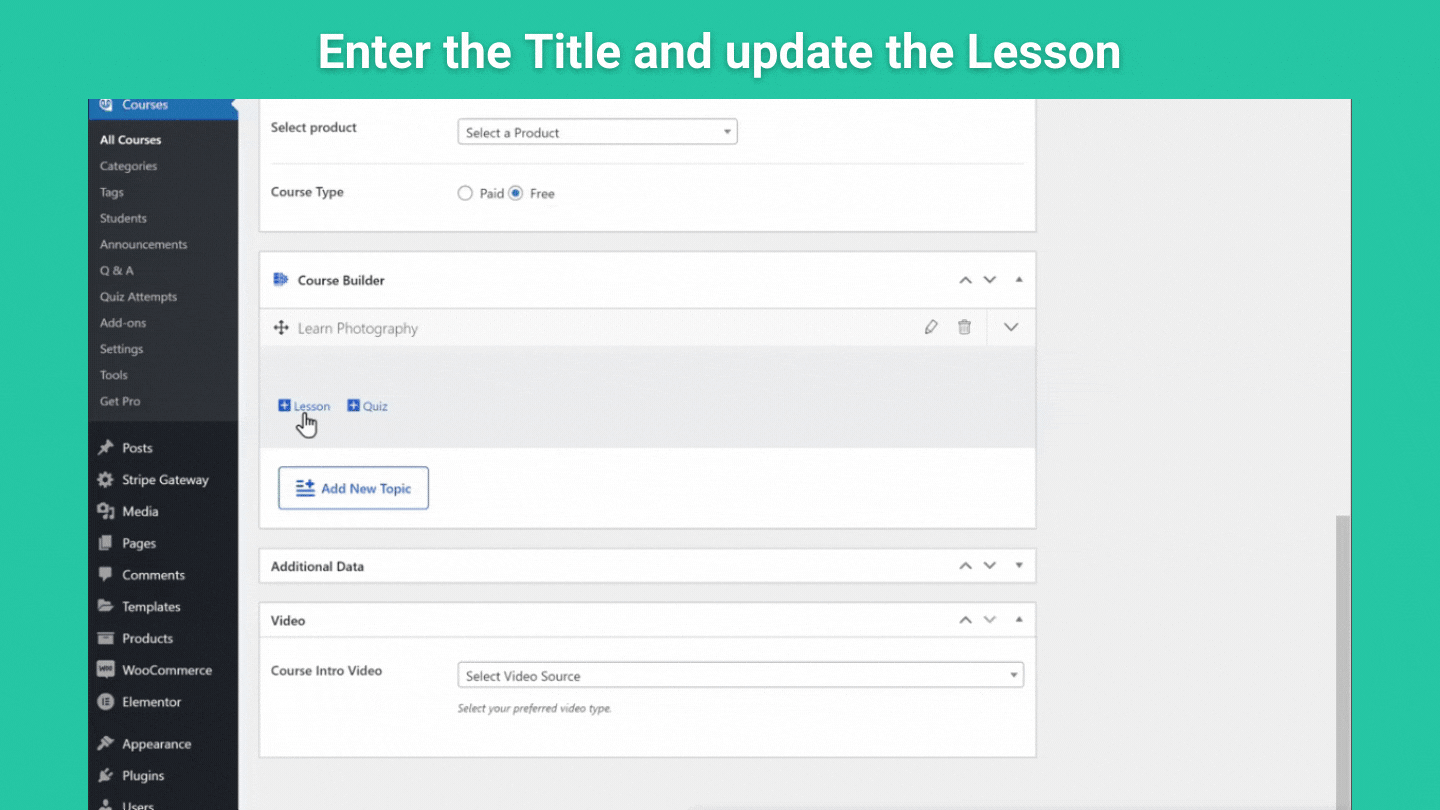
Likewise, you can add all the lessons to all the topics you have created.
Once you’re done, click the update button.
And all the lessons will be added to the respective topics.
So finally, we need to add the content to the course.
2.2.4 Add the course content/videos to your lessons
Now to add the content, just go to the course page.
And select the lesson to which you want to add the content.
Here, you can add your content either in video or text format.
As most of you will be uploading videos,
So let’s see how to add video content,
Now to add a video, just click on ‘Select Video Source’
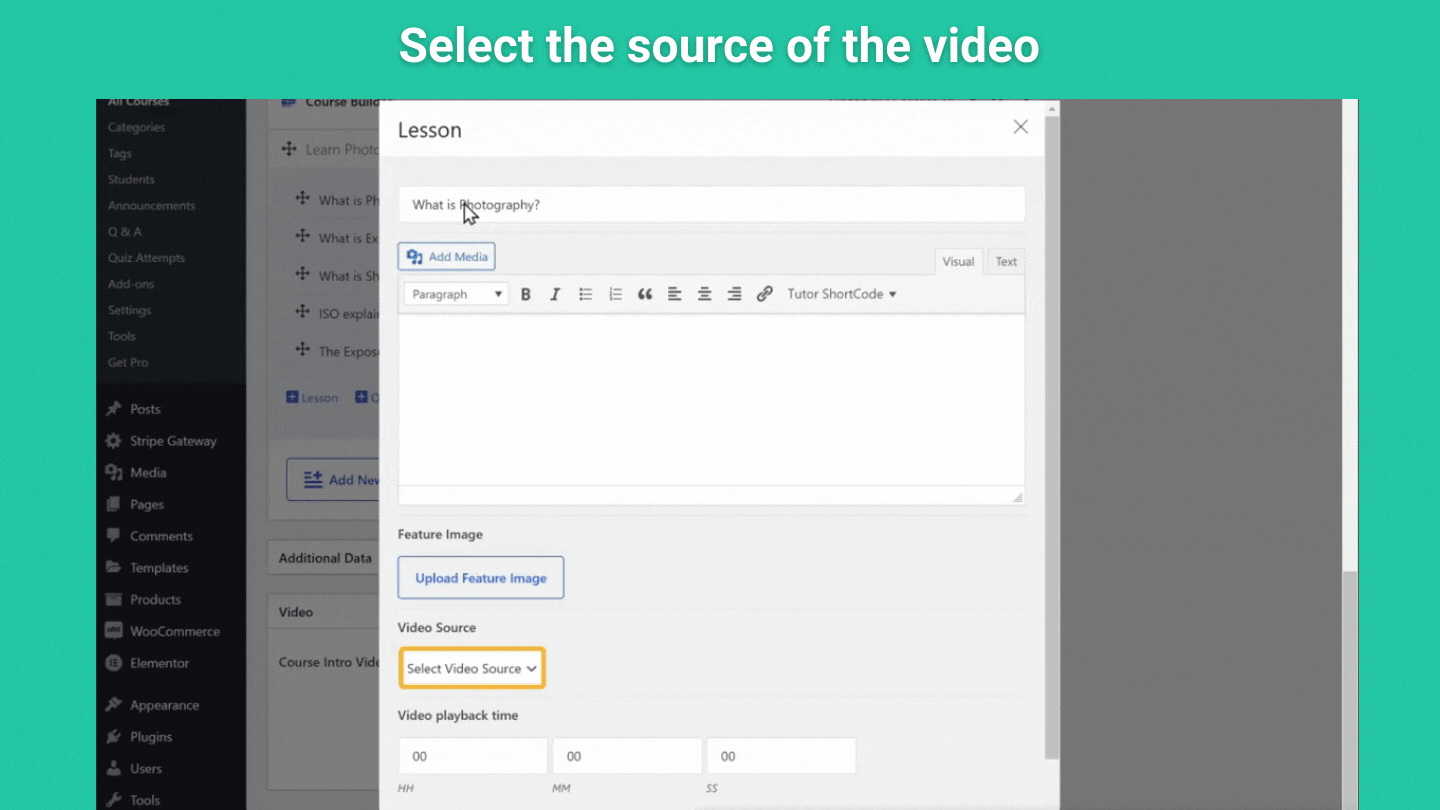
And you will get different video sources that you can select from
Since you want to add videos for your course, especially if you intend to sell them on your site,
We advise you to go with Vimeo, as it helps to protect your content by preventing people from downloading it. 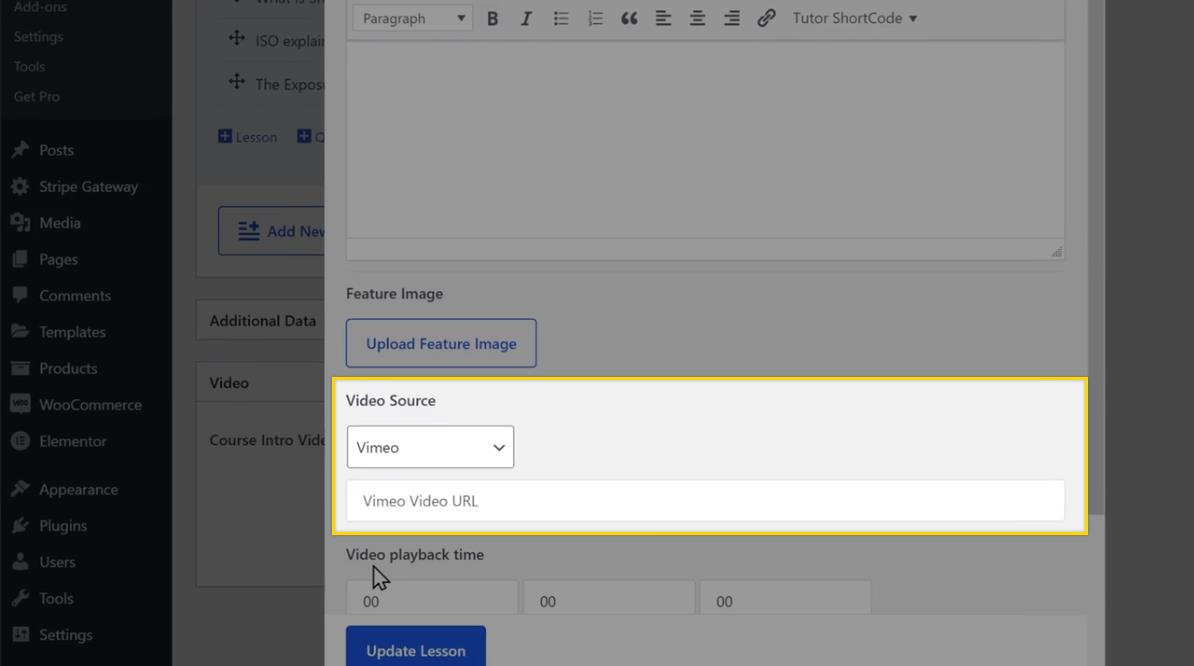
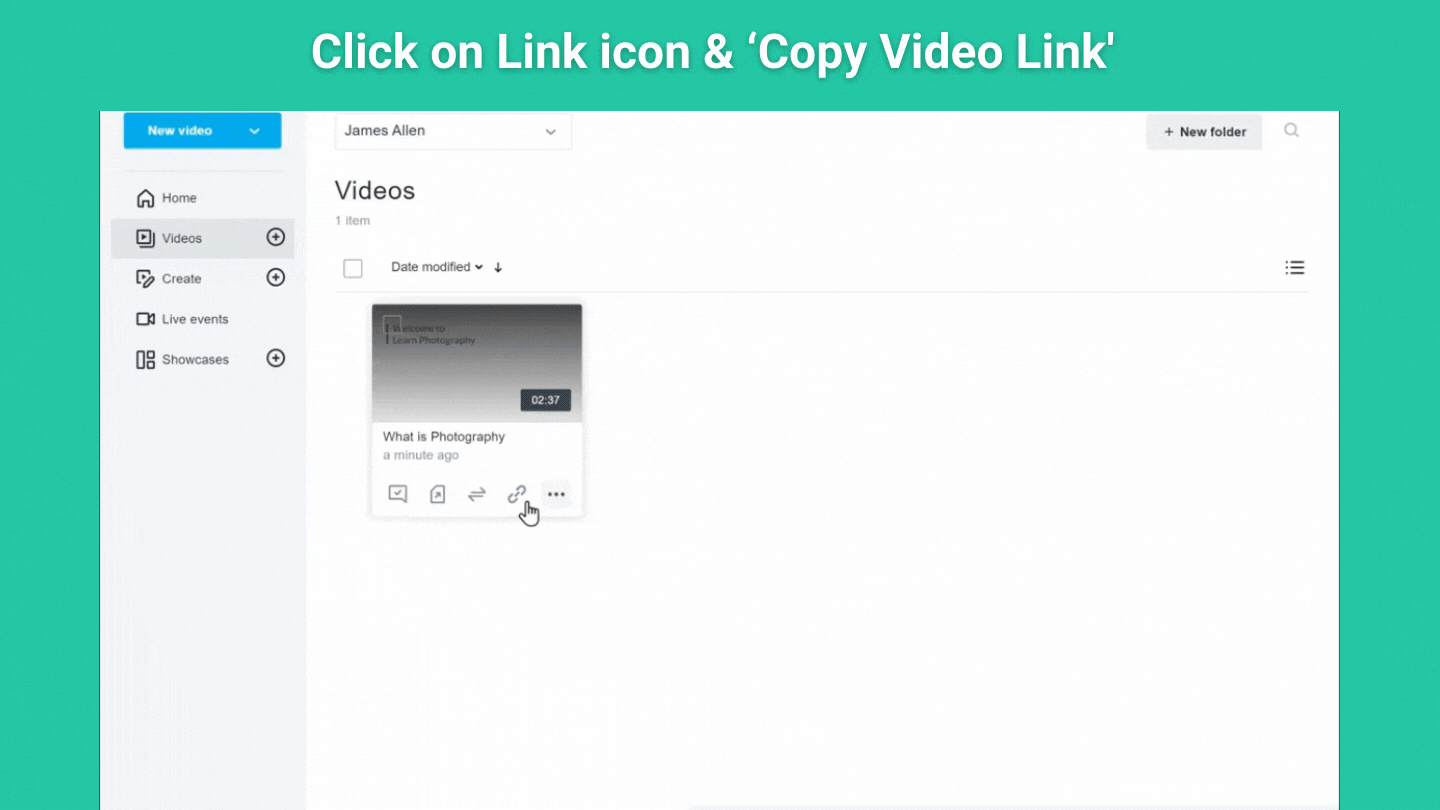
So, create an account on Vimeo and upload all your videos/course content on it.
Once you have done that,
Just copy the video URL of the content which you want to add to your lesson.
Go to the respective lesson page on your site.
Paste the video URL and click ‘Update’
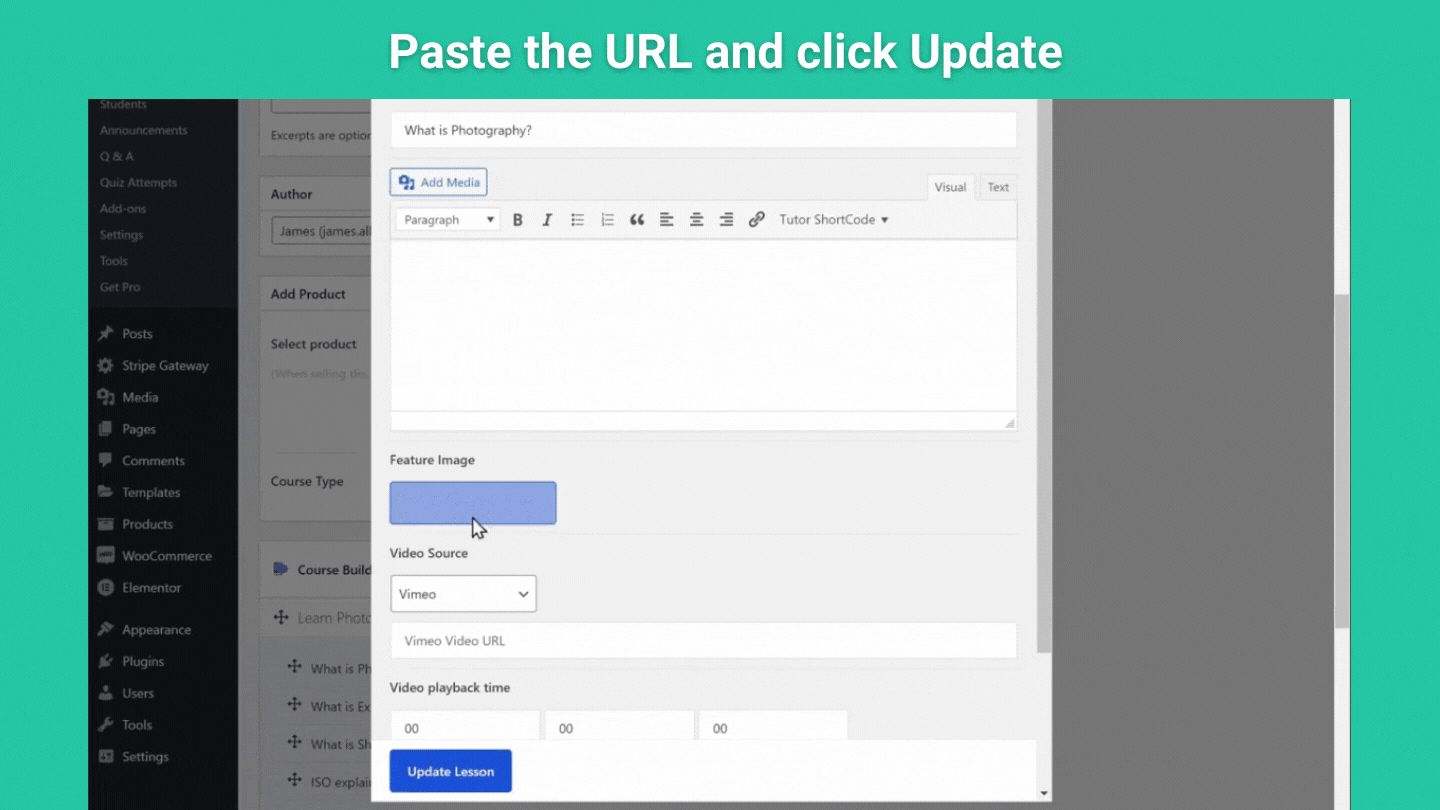
Your course content/video will be added and accessible on your site.
You can go back to your site and then check it.
In the same way, you can add video content for all the lessons.
So this is how you can add the course content to your site.
But we still have the default text content on our site.
So next, let’s see how to edit the page contents,
2.3 Edit the content on your site.
So to edit a page,
Just go to any page that you want to edit
Click ‘Edit’ with elementor
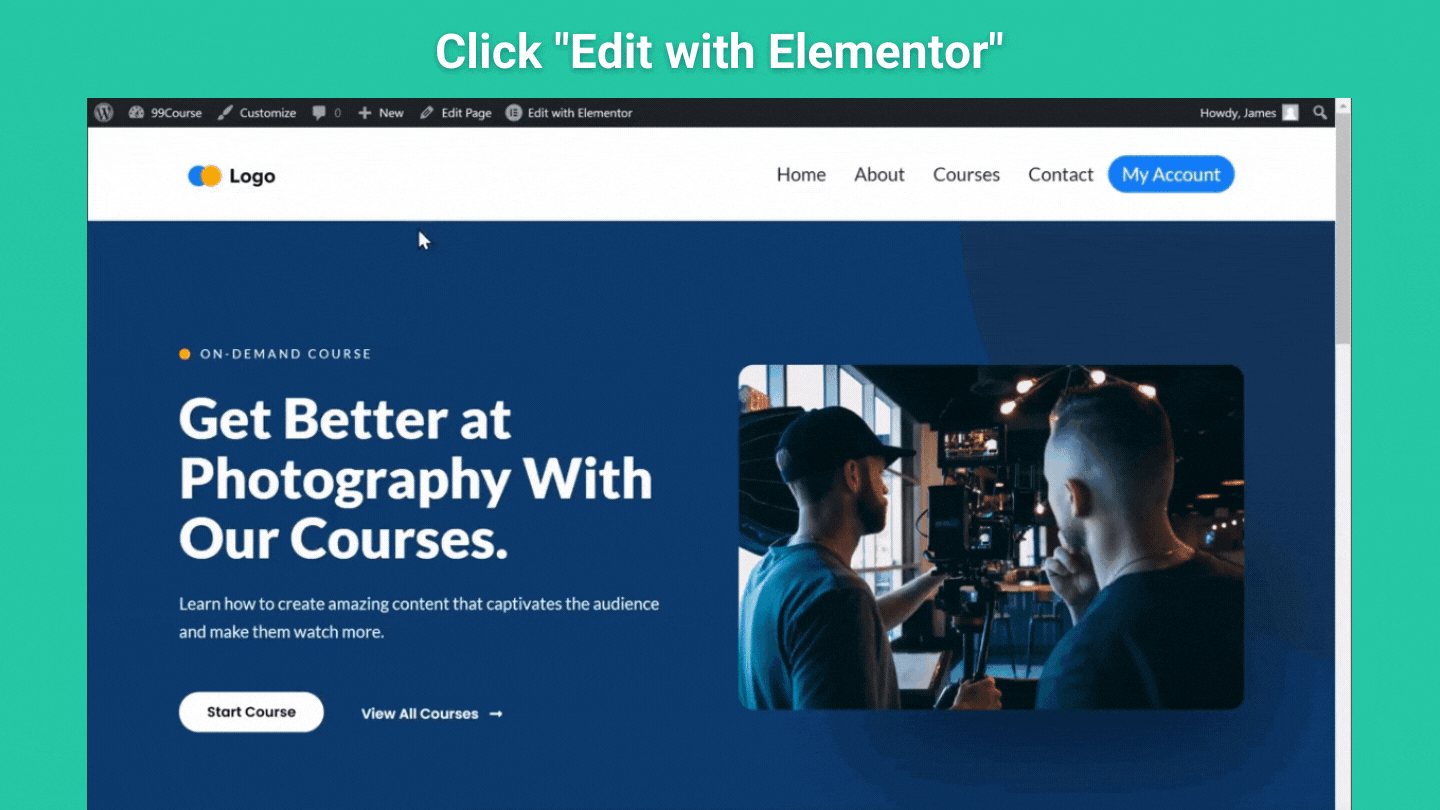
Now you can customize all the elements as per your liking.
To change a text, all you need to do is select it and then replace it with the text you want,

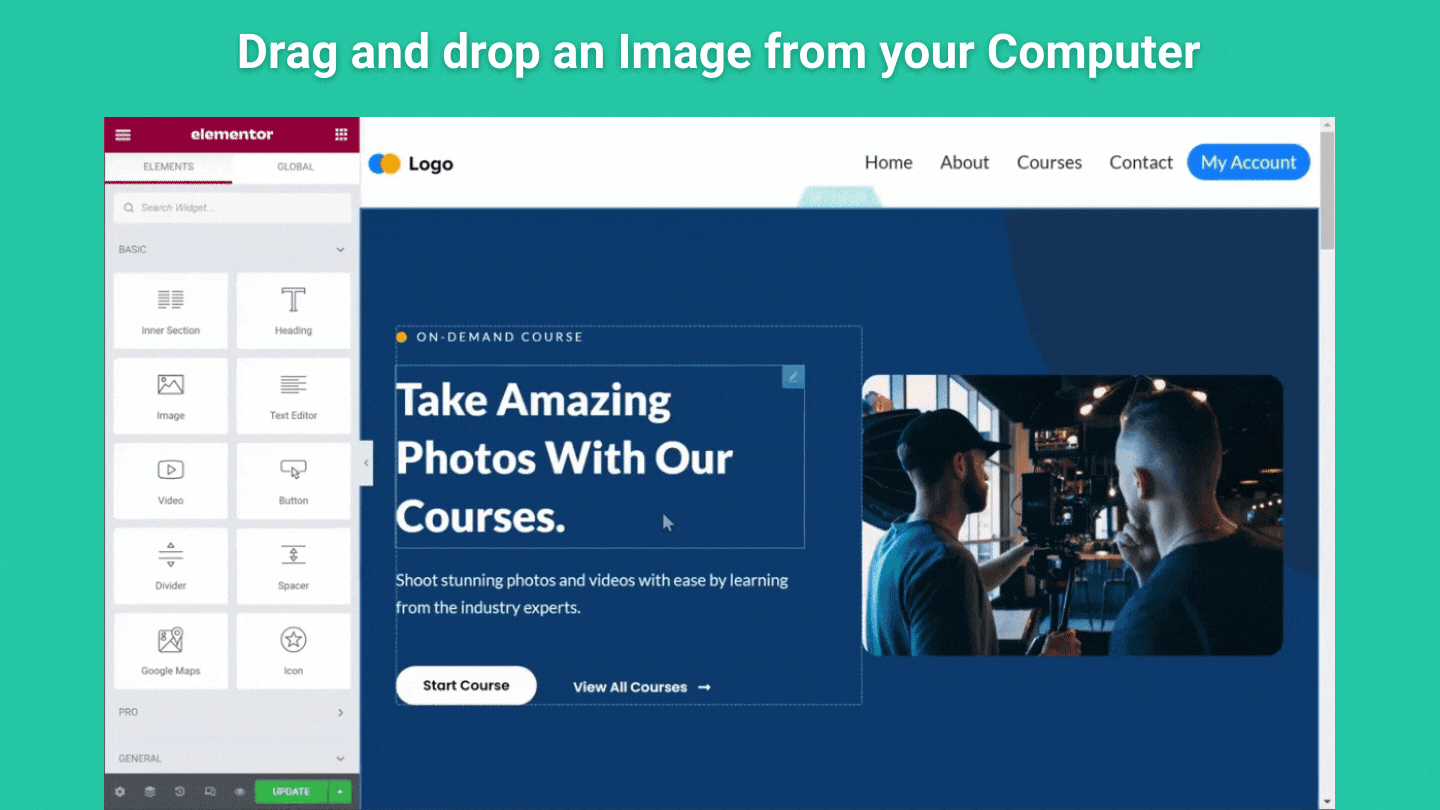
And if you want to change an image, just click on it and select the image in the editing section.
Now just drag and drop the image from your computer, and it will be replaced.
Similarly, you can any element on your page.
Once you have completed editing the page
Next, we can add pricing to our course.
2.4 Change it into Paid Course
We can do this in 2 steps.
- Create and link your course as a product
- Add a payment method
Now, as we said before,
All the important plugins will be installed once you launch your site.
Now we will do the first step with the help of 2 plugins.
WooCommerce plugin to sell your course and the Tutor LMS plugin helps create courses on our site.
2.4.1 Create and link your course as a product
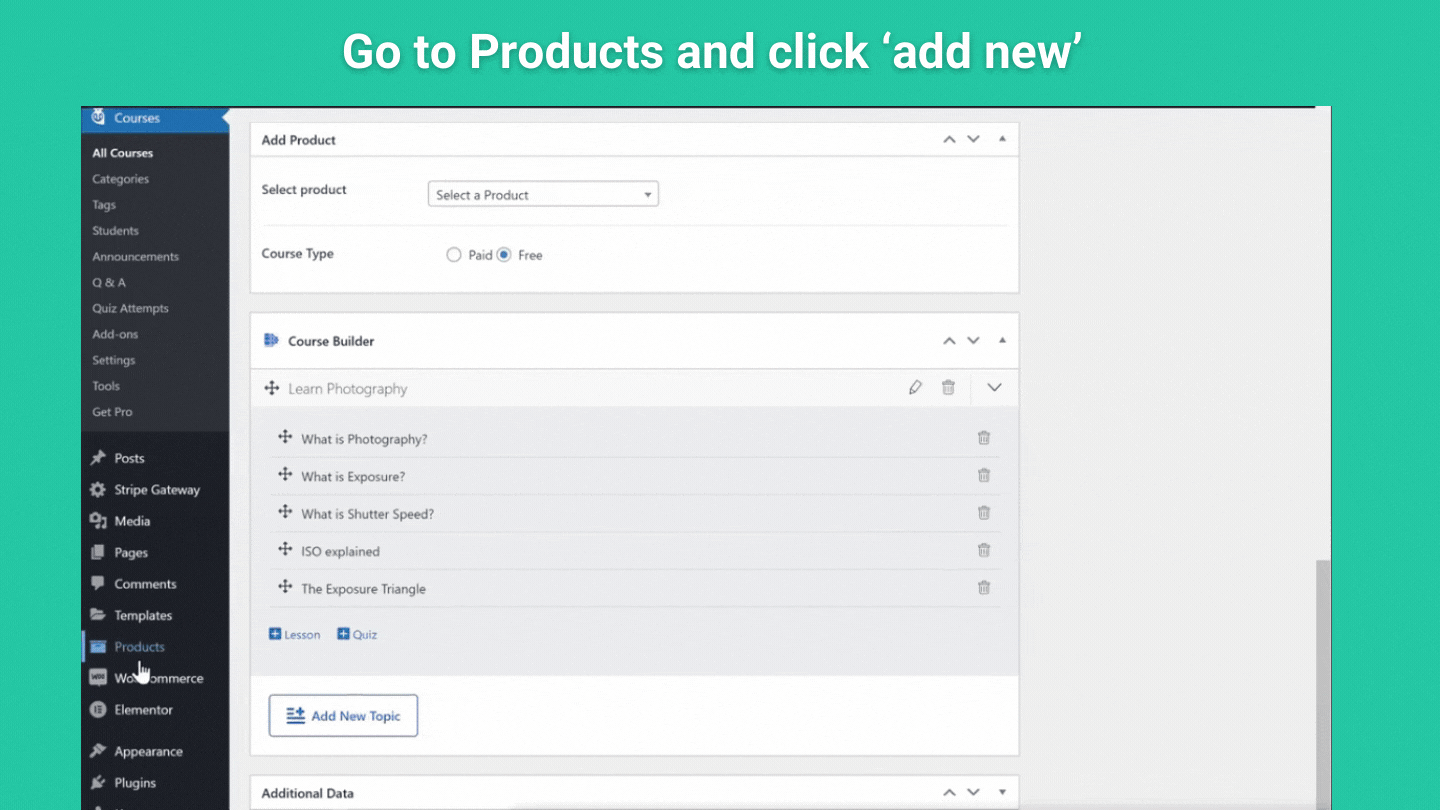
So first, to create a product.
Go to ‘products’ on your WordPress admin page and click ‘Add New’
Here enter the course name that you created your course with and enable the option ‘For Tutor.’
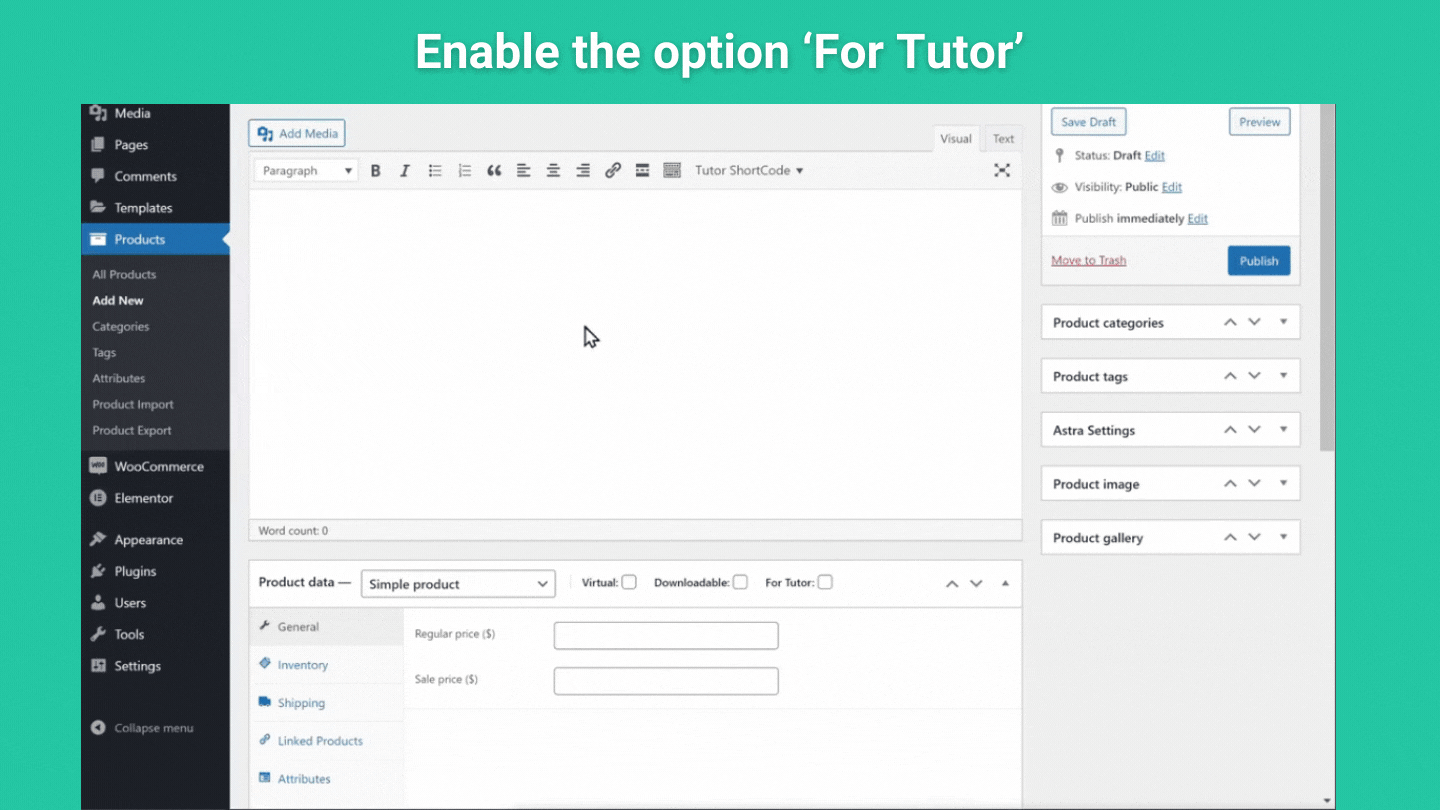
Next, enter the price you want to sell in the ‘Regular price’ section.
And click ‘Publish’ to create the product.
Once you have created your product, we can link our course to it.
So to link the product with the course,
Go to Courses and click on ‘All Courses.’
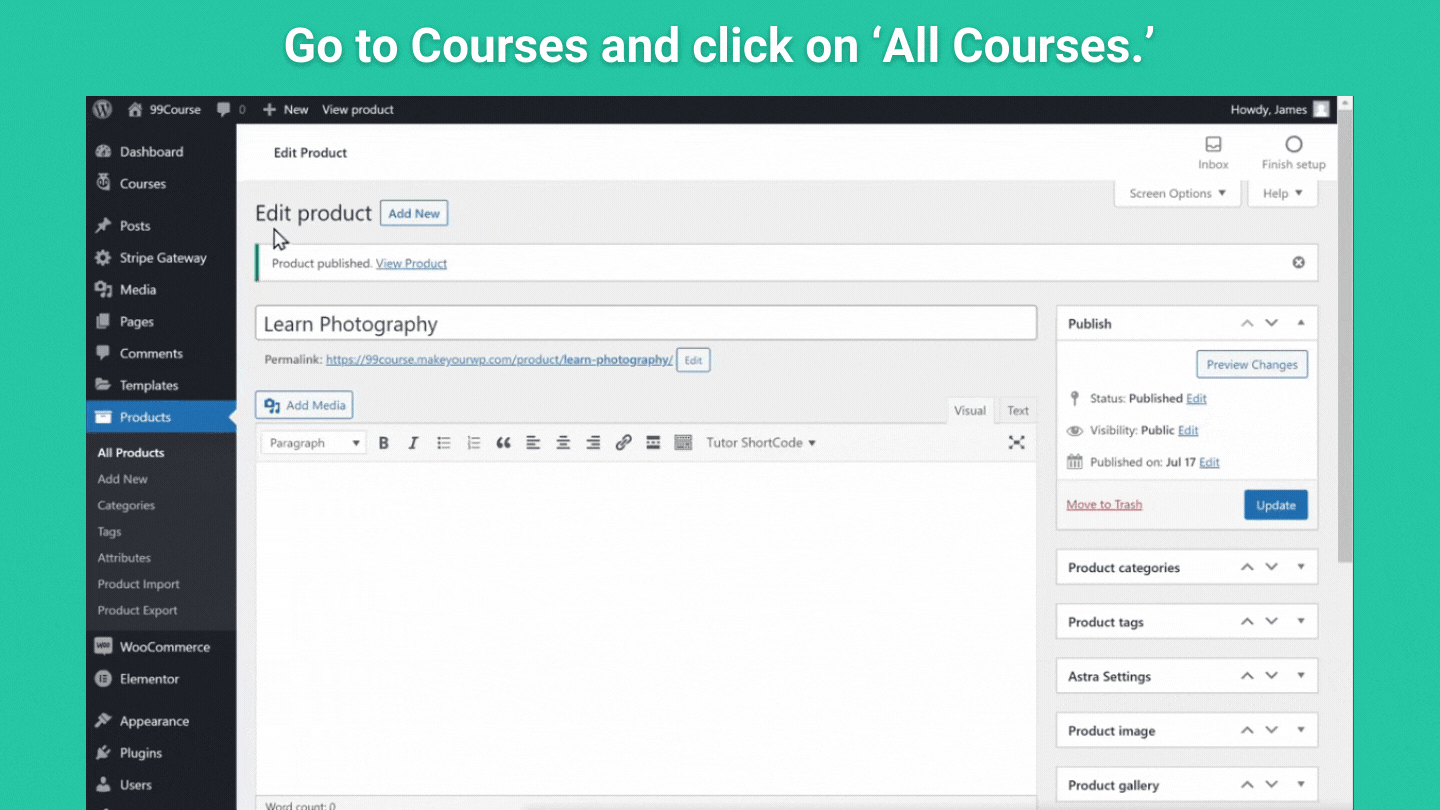
Then open the course you created earlier.
Now, if you scroll down, you can see that the course type is set to ‘Free’.
Check the paid option and select the product to make this into a paid course.
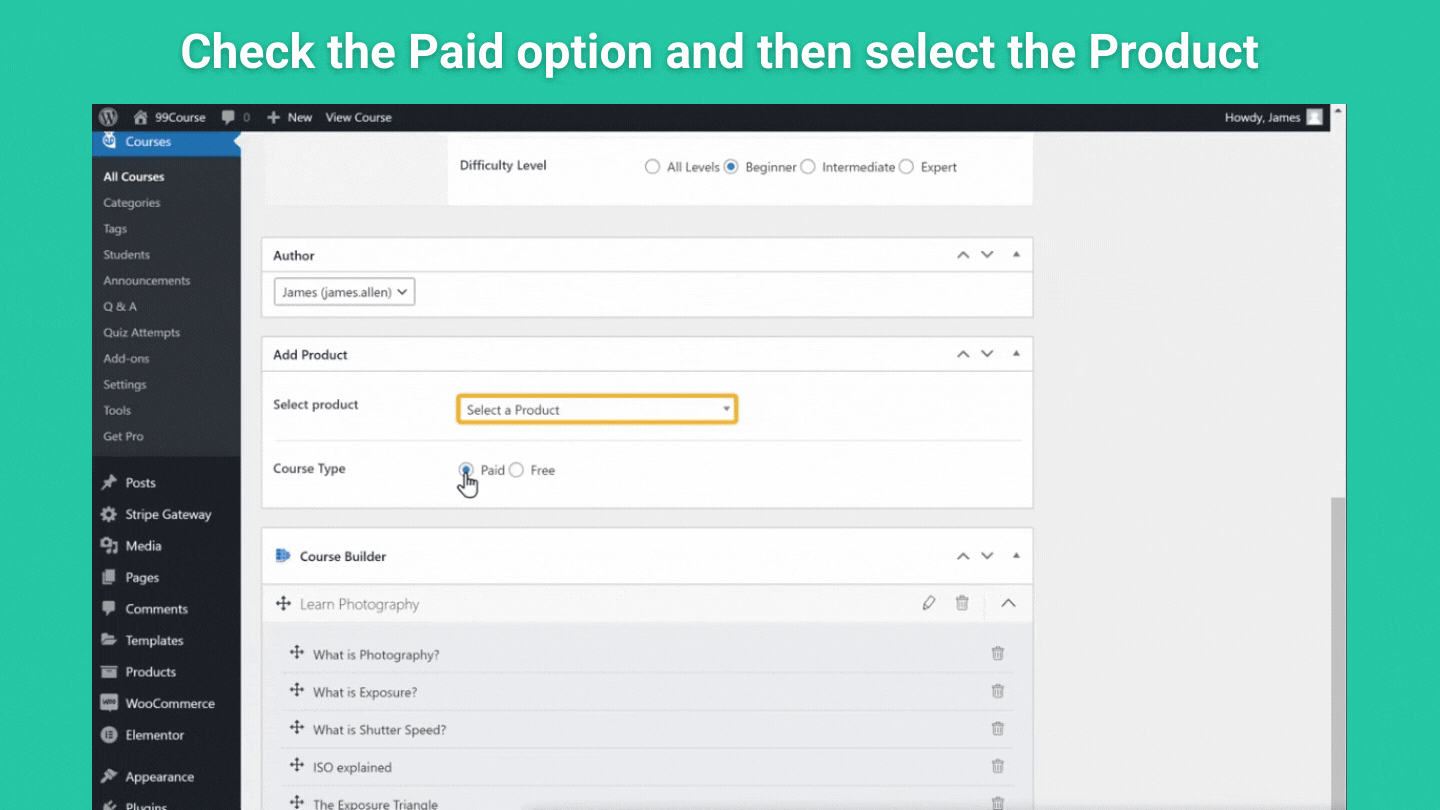
So now you have created your product and linked it to your course.
Once this is done, just click update.
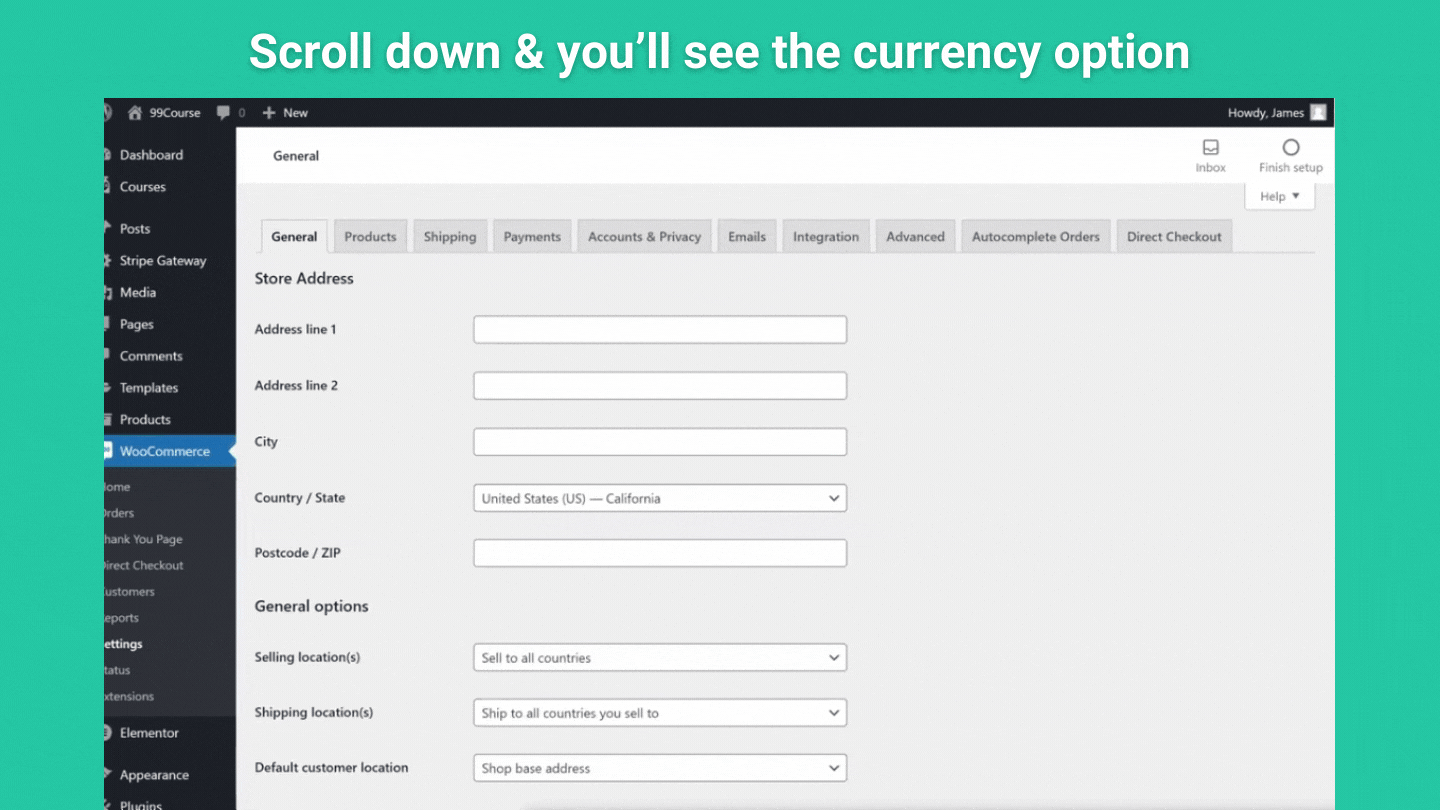
Now, if you want to change the currency,
Just go to WooCommerce ‘Settings’
And go to ‘Currency’ options; from here, you can select the currency you want
So now, creating a product and linking the course is done,
Next, we need to add a payment method to let your customers pay for the course, and you can receive it directly in your account.
2.4.2 Add a Payment Method
So to add the payment method to your site,
Go to WooCommerce ‘Payments’
Here, select ‘Stripe’ 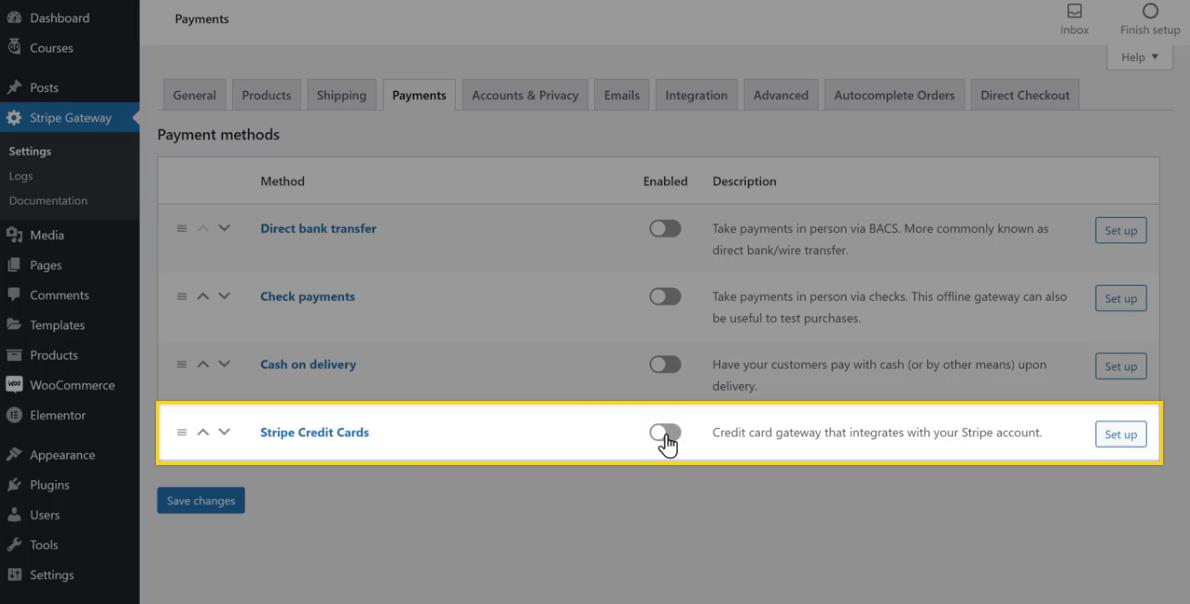
Now you need to sign up for stripe and add your bank account to it,
The signup part and adding a bank account are self-explanatory.
So, once you have done that,
You will be able to accept payments from your customers, and they’ll be able to purchase from your site.
Okay,
Now, our site & course is ready except for the domain part,
So next, let’s see how to get your own domain for your site.
2.5 Getting your own custom Domain
To get your own custom domain, just click here
And it will take you to WebSpaceKit.
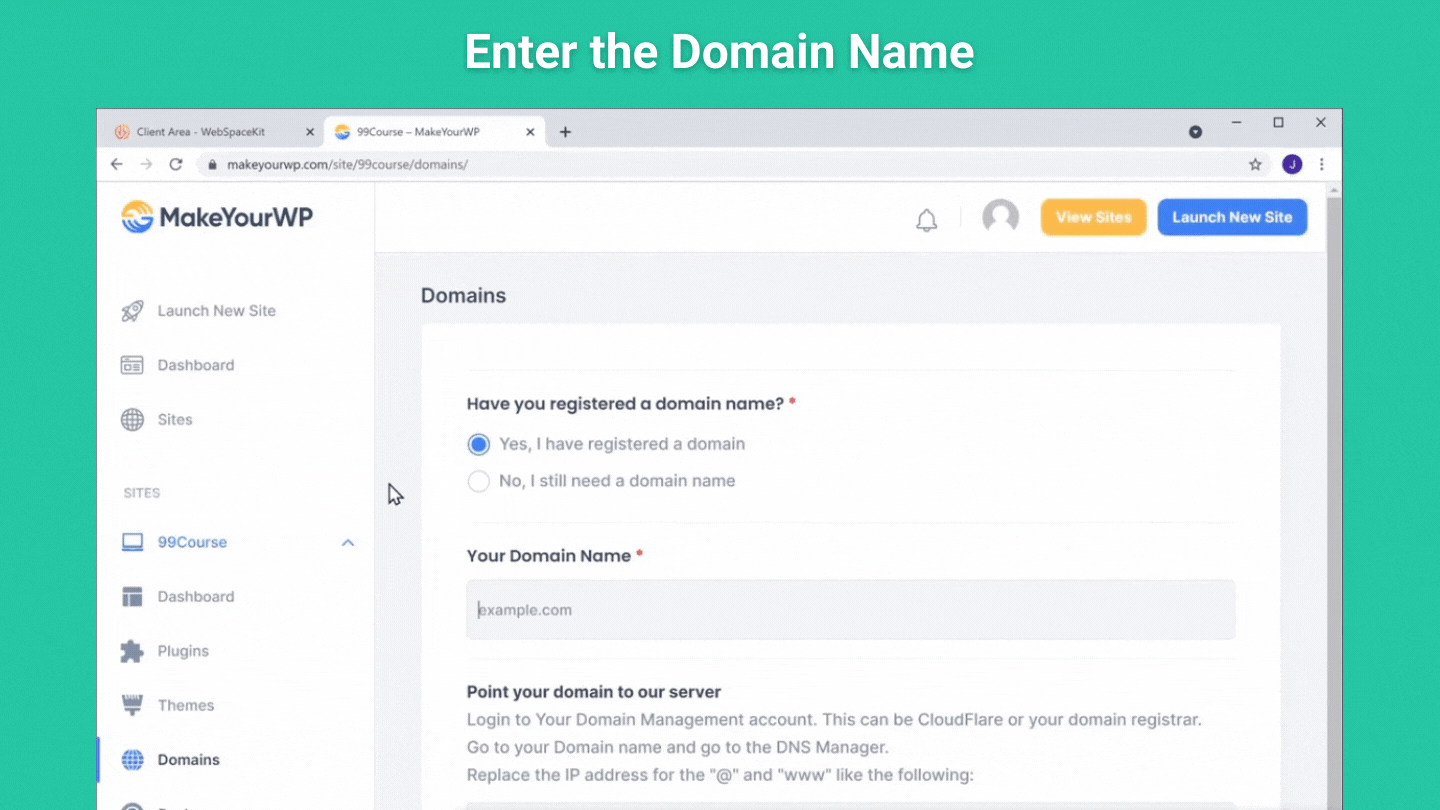
Here enter the domain name you want for your site.
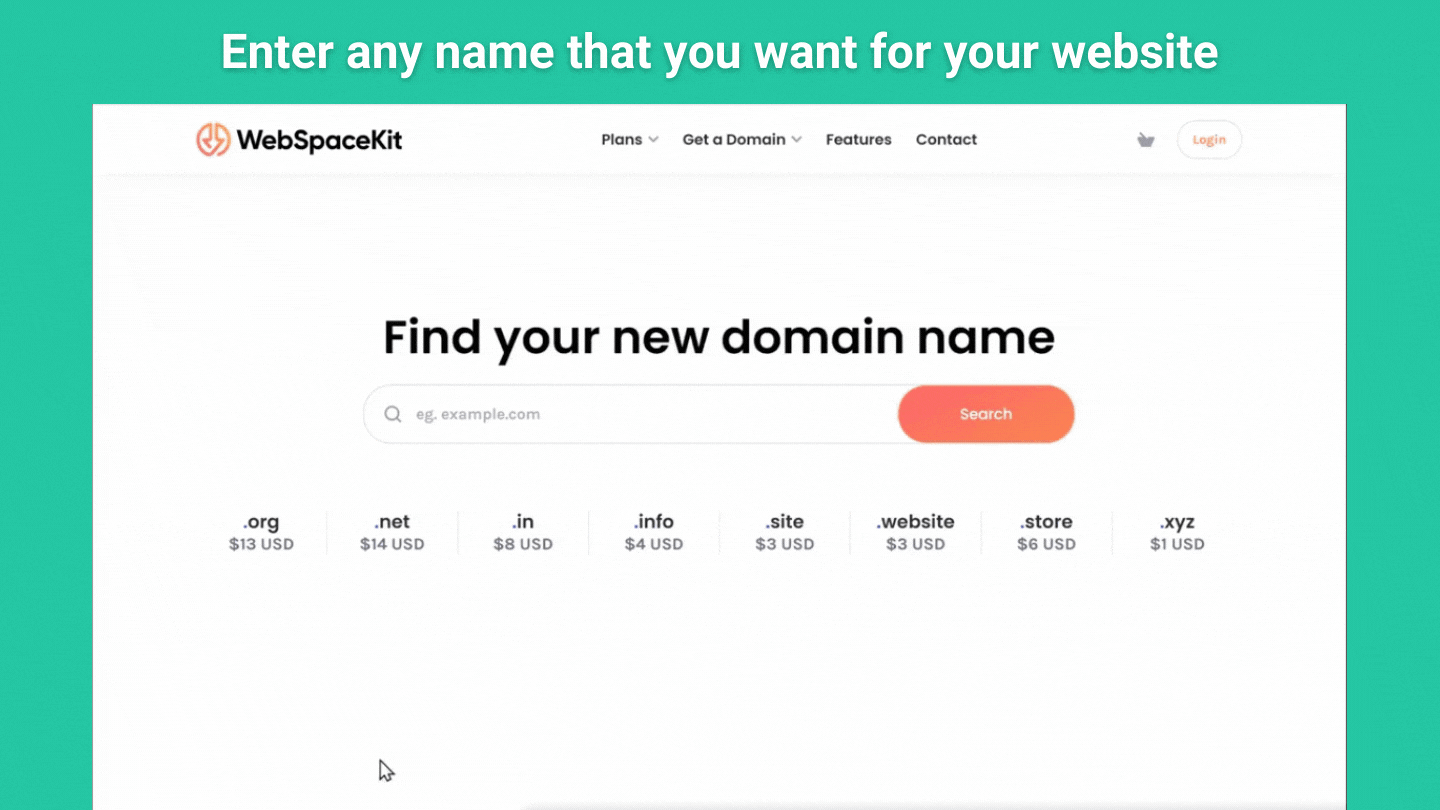
And if it’s available, go ahead and purchase it.
Once you have got the domain name
Next, we need to connect it with our site.
We can connect this in 2 simple steps,
- Add your domain to MakeYourWP.
- Add IP address to your Domain.
2.5.1 Add your domain to MakeYourWP
To add the custom domain,
Go to the MakeYourWP dashboard and go to ‘domains’
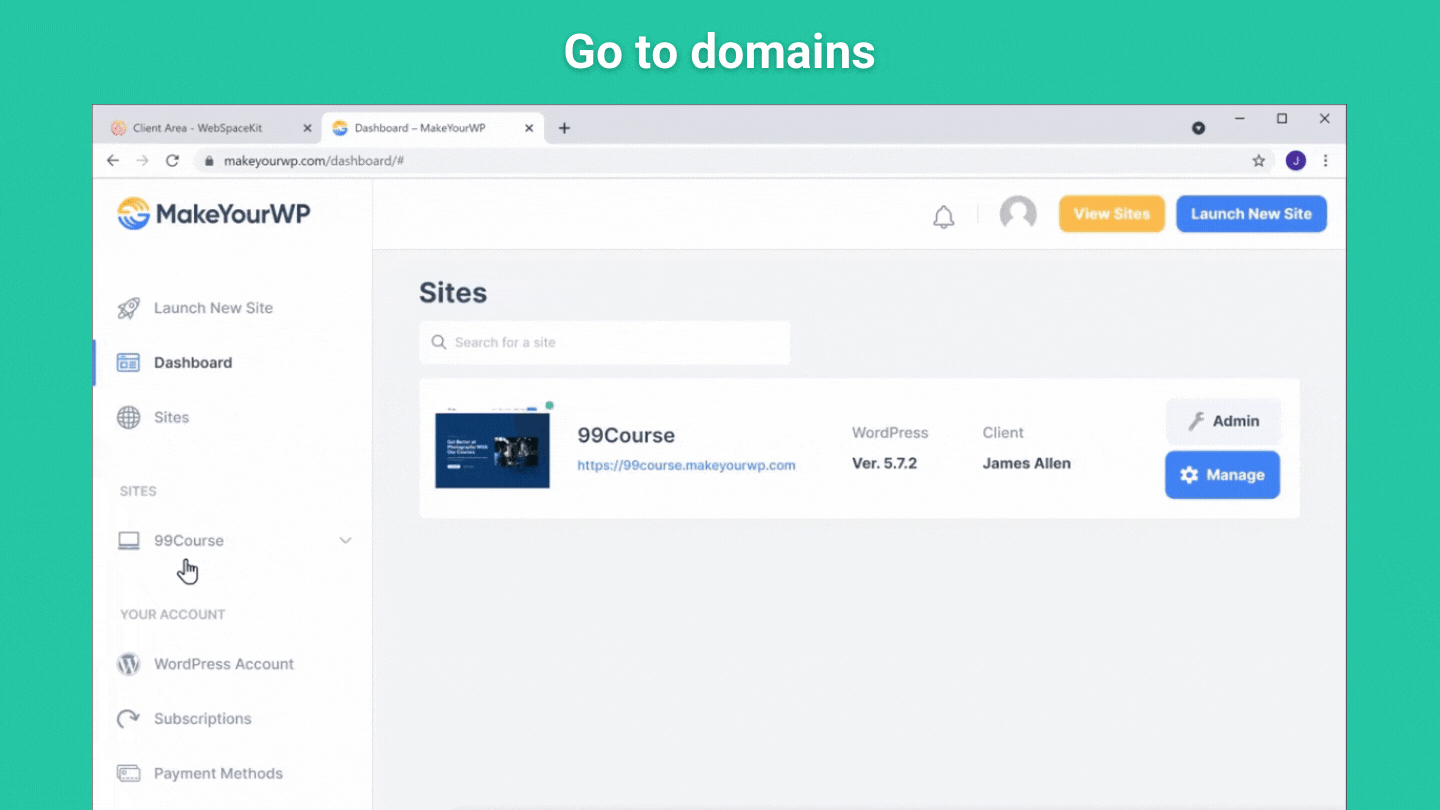
Here, enter the domain you have purchased on WebSpaceKit.
Next, we need to add this IP address to your domain.
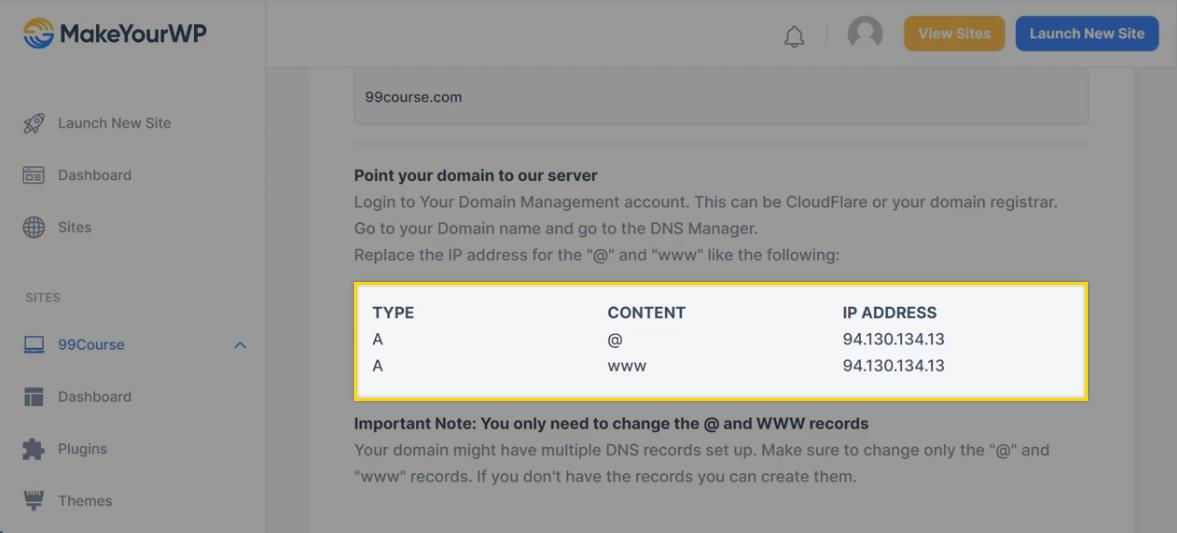
2.5.2 Add IP address to your domain
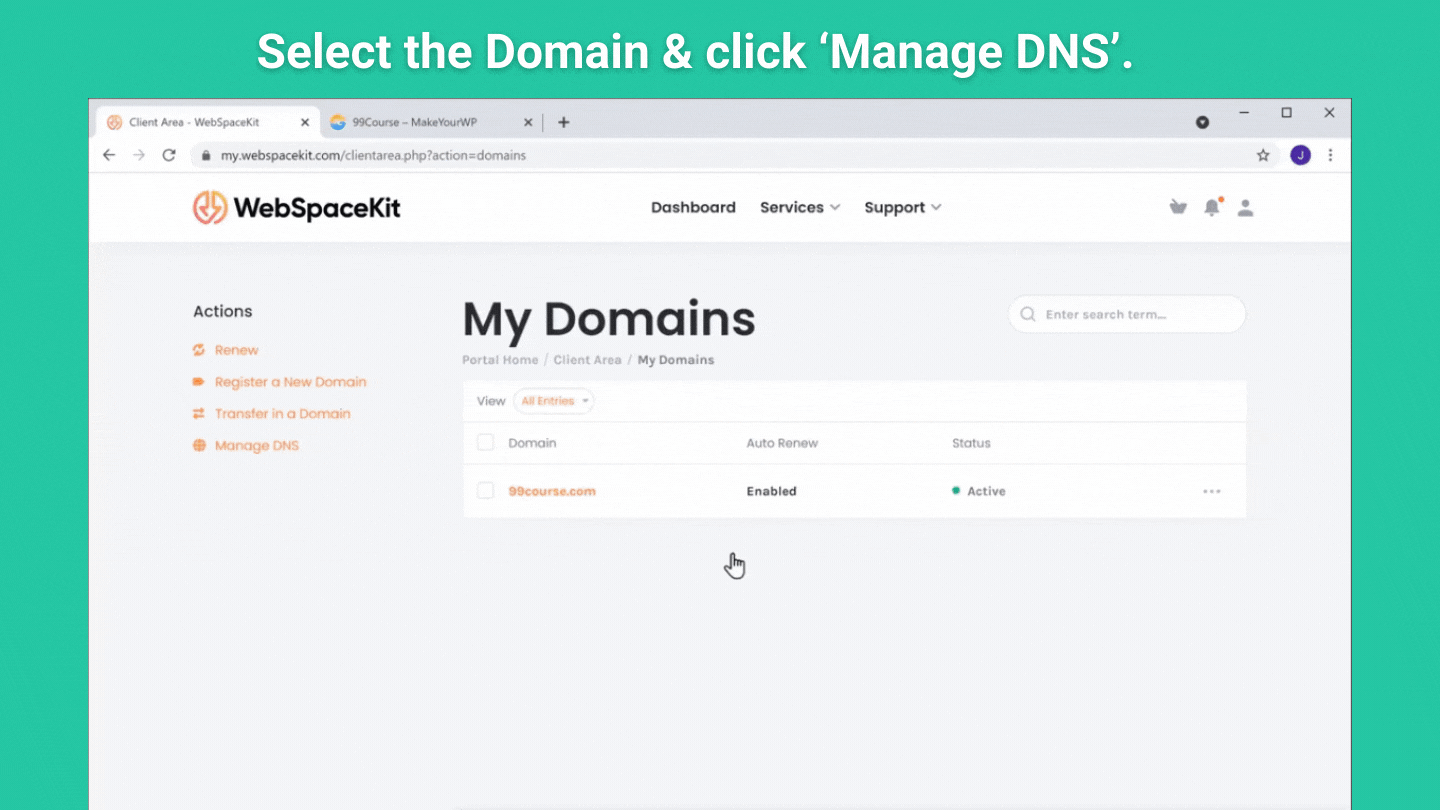
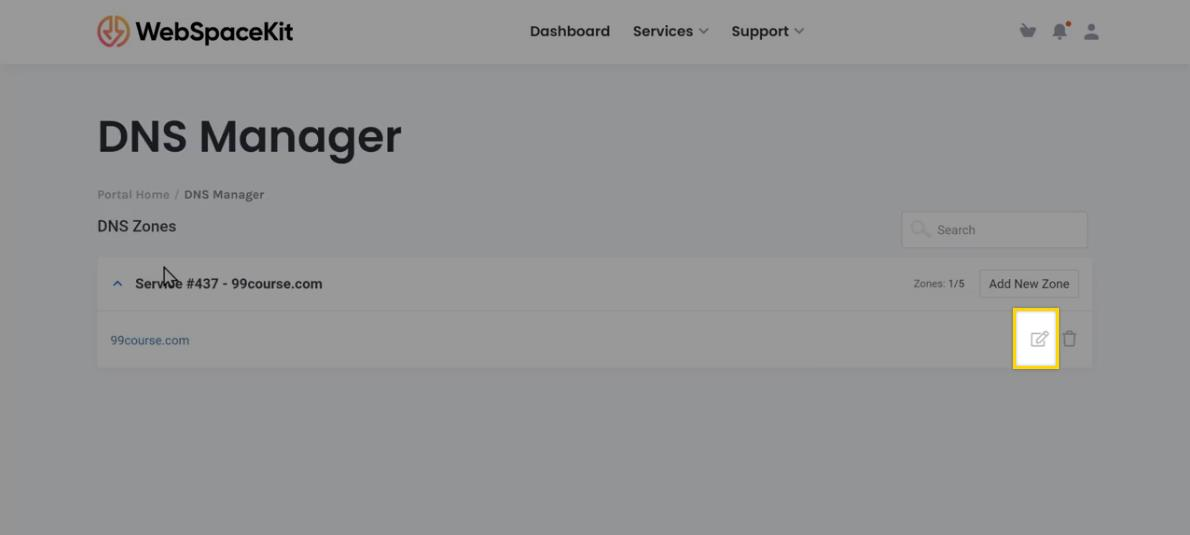
To add the IP Address, go to domains on your WebSpaceKit account,
Click ‘manage DNS’ on the domain you purchased.
And click the editing icon to edit your IP Address.
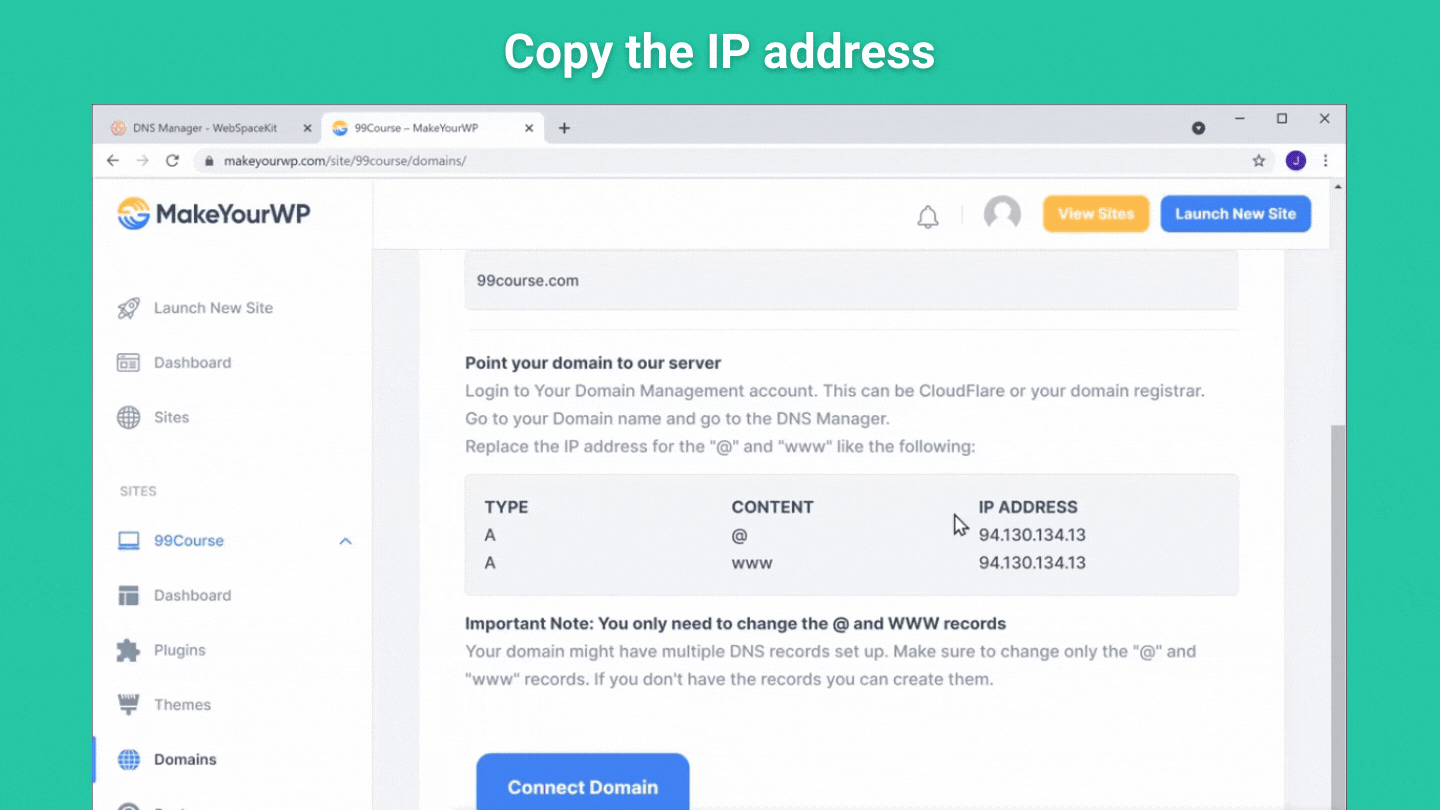
Here next to the ‘A’ record, you need to add your IP address from the MakeYourWp page,
So let’s go back, copy this ‘IP address’
And then paste it on the ‘A’ records.
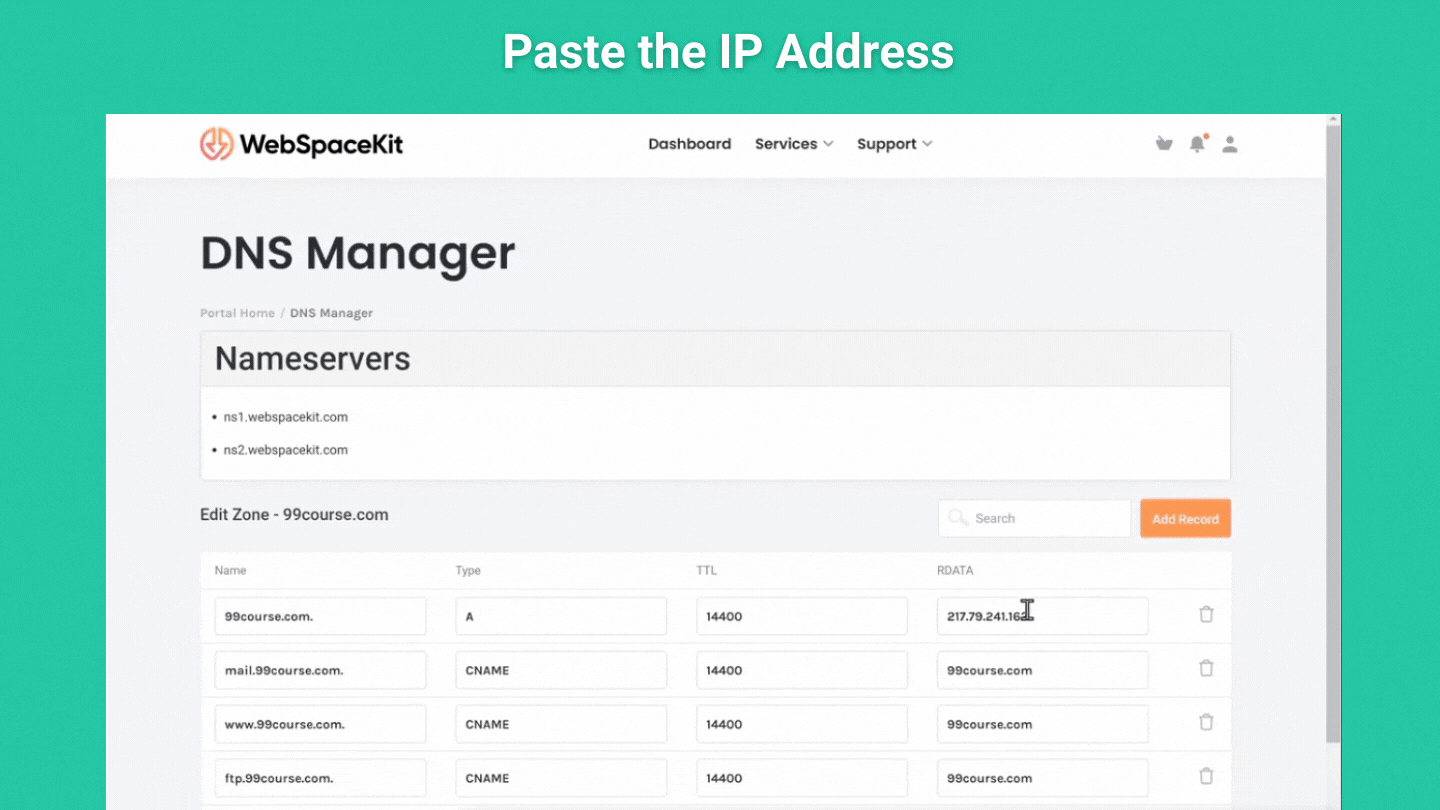
Then click ‘Save Changes’
And finally, go back to makeyourwp and connect the domain.
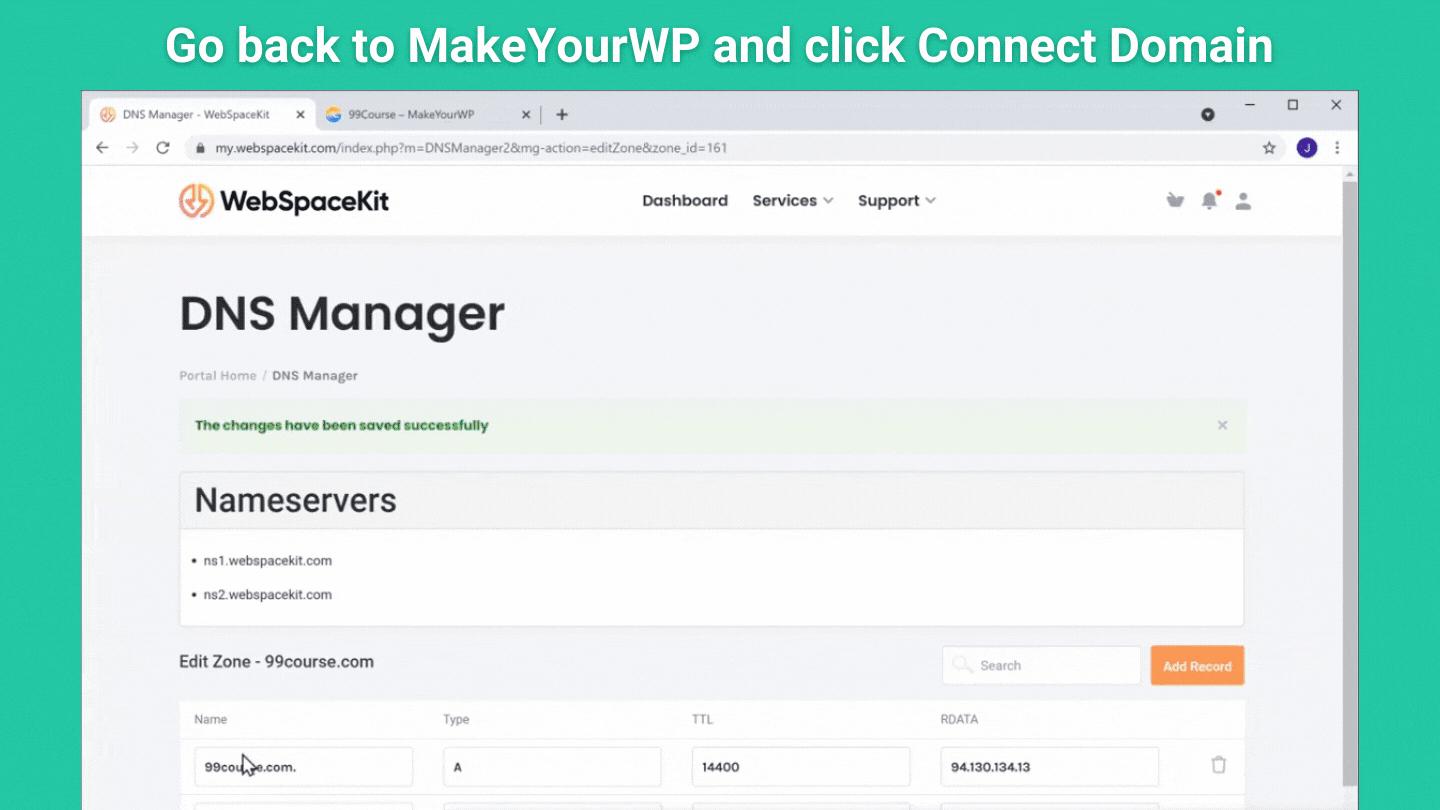
So we have successfully connected our domain.
Promote Your Online Course Website
Once your online course website is ready, you should focus on promoting it.
Getting your course online is just the first phase. Making it reach the right audience is the final and important phase, as it’s the one that will make a profit for you.
So here are a few ways to promote your online course site.
- On-Page SEO and Blog posts
- Give away/Provide free valuable content.
On-Page SEO and Blog Posts
Doing proper SEO helps your site rank better and increases traffic to your site, leading to more sales.
Driving traffic to your site and reaching the right audience is the key to making more sales. Blog posts and social media promotion helps you to increase traffic and target the right audience. So, always keep promoting, as it’s the only thing that can drive your sales.
Giveaway/Provide valuable content.
Provide free valuable content either on your YouTube channel or through newsletters, This will help you increase your brand’s trust and create a community that values your content.
You can also host webinars and giveaway guides/e-books. This will help people know and remember your content’s worth, so you can always have an audience looking forward to your courses.
Conclusion
So by now, you should have a good idea of how to launch your own online course WordPress website and sell your online course using MakeYourWP.
And we believe we were able to provide you with some valuable information that will make creating your site easier.
Building your own site is less expensive and profitable in the long run. You can also add as many courses as you want, and your site will work fine without lags or a slowdown. So don’t hesitate to start your own site and put in the effort.
The only thing good about depending on a platform is the quick and easy way to launch your course online, but that’s about it. With MakeYourWP, even launching your own site online has been made easy.
So, with this, it’s safe to say that building your own online course website is the best thing to do.
Go to ‘makeyourwp.com’ and launch your online course website today!